Assisted 3DS authentication - Biometric 2FA
Learn about our Assisted 3DS authentication model — Biometic 2FA / Out-of-Band (OOB) where your platform participates in the authentication flow. This guide explains your role in managing the user challenge process for securing online transactions by utilizing biometric authentication in your applications.
Note:
Please be aware that this feature requires a specific change to your program's configuration before it can be enabled. It is not activated by default for new or existing programs. Reach out to your MatchMove Implementation or Sales team to learn more and initiate the setup process.
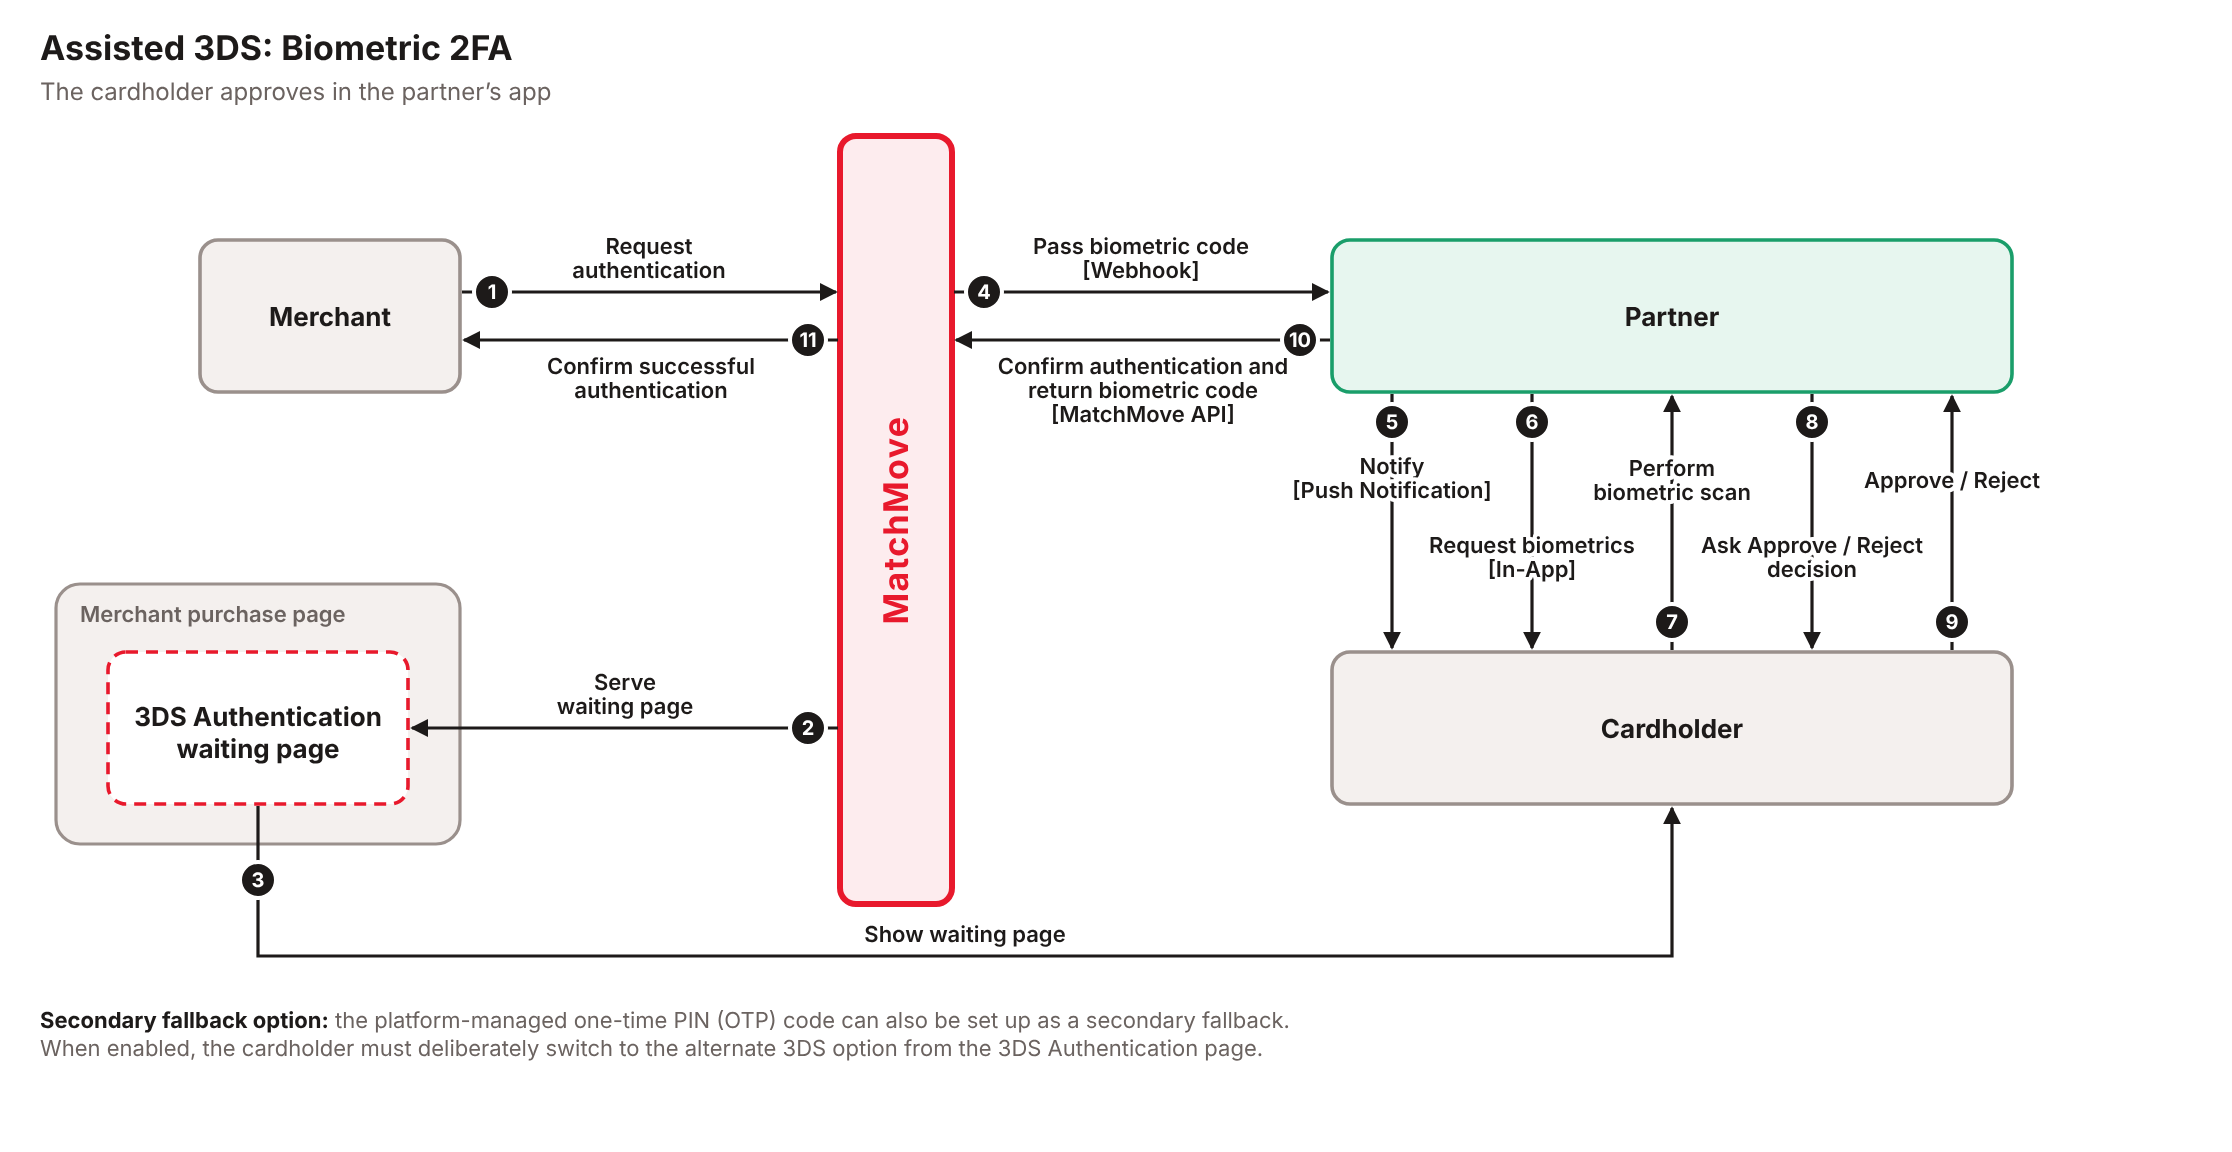
Both Assisted 3DS authentication models use a hybrid approach where MatchMove sends a security code to the partner via a webhook, but they take entirely different paths for the final user verification:
- Assisted 3DS (OTP): Focuses on Code Delivery In this model, MatchMove handles the security and generation of a One-Time Password (OTP). The partner’s responsibility is strictly last-mile delivery. They take the OTP provided by the webhook and pass it directly to the cardholder through their own channels (like SMS or email) so the user can complete a standard code challenge.
- Assisted 3DS (Biometric 2FA): Focuses on Native Verification Instead of passing a code to the user, the partner takes full control of the authentication challenge. The webhook acts as a silent trigger, prompting the partner to initiate a native biometric check (like Face ID or a fingerprint) within their app, where the user simply approves or rejects the payment. The security code is never shown to the user; it is only used on the backend to authorize the transaction once the biometric check passes.
How It Works: Biometric Authentication Flow
- Challenge Initiated: The platform identifies the need for 3DS verification and displays a biometric authentication waiting page to the cardholder.
- Code Generation: The platform generates a secure, unique backend authentication code.
- Webhook Handoff: The platform instantly sends a webhook carrying this authentication code and the transaction context to the partner’s server.
- Partner Prompt & Authentication: The partner receives the webhook and triggers an immediate mobile push notification requesting the cardholder to verify an incoming transaction. Tapping this notification opens the partner's mobile app, prompting the user to authenticate via their device's native biometrics (e.g., Face ID or fingerprint) and explicitly approve the payment.
- Final Verification: After the cardholder approves the payment via biometrics, the partner sends this confirmation back to the platform by calling an authentication API (passing the secure code and the cardholder's decision). Finally, the platform validates the API payload and authorizes the transaction.
Biometric Authentication Waiting Page
In the live environment, the cardholder initiates an online or e-commerce payment request directly from a merchant's website or application.
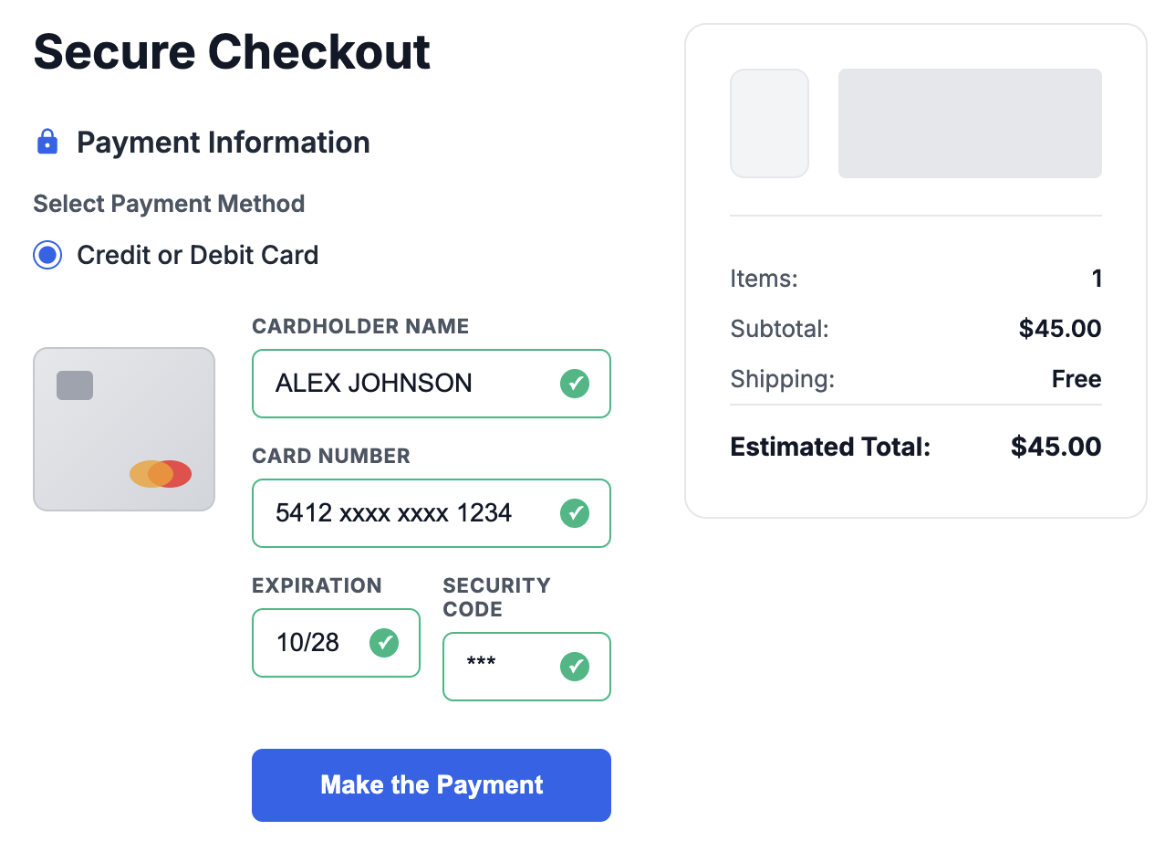
If the merchant's payment system requires 3DS authentication, the payment network will initiate an authentication request. Because biometric 2FA is enabled for the program, the system will automatically render the Biometric Authentication Waiting Page.
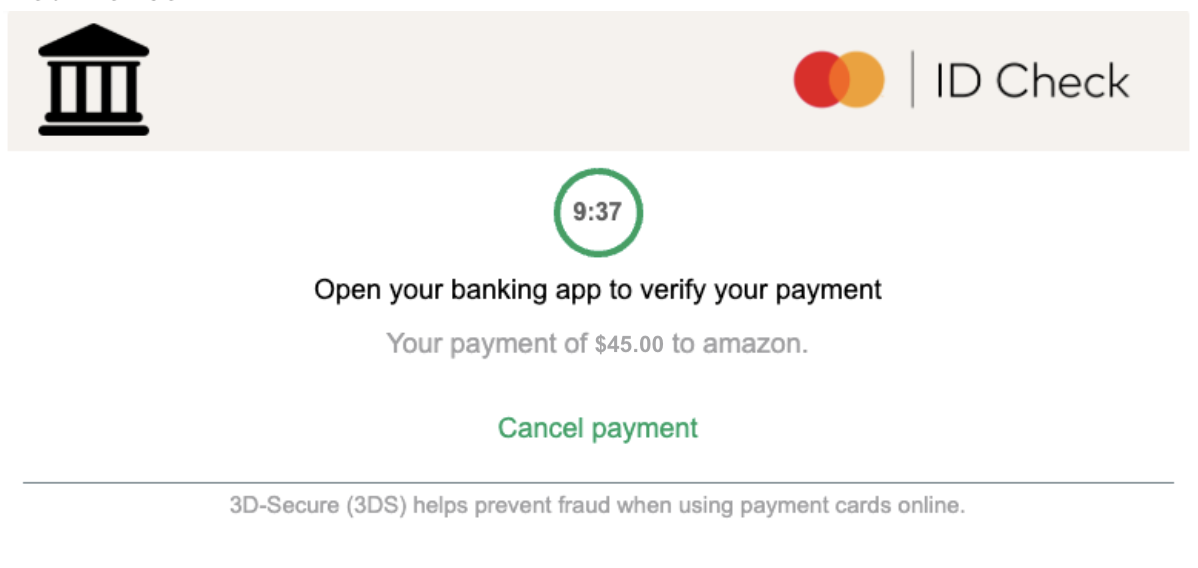
This is where the native biometric 2FA authentication process begins on the MatchMove platform.
Getting Started with Assisted 3DS Authentication
Assisted 3DS Authentication (both OTP and Biometric 2FA) is an OPTIONAL service available for new and existing partners.
- Default Behavior: Without this service enabled, MatchMove is solely responsible for delivering the standard 3DS OTP to the enabled delivery channels.
- Assisted 3DS Enabled: When this service is activated, the partner takes control of the authentication experience. Depending on your configuration, you can either take over the direct delivery of the 3DS OTP to your cardholders or participate in a seamless native biometric challenge within your application.
1
Enable Biometric 2FA in your program configuration
Partners who want to enable Assisted 3DS Authentication - Biometric 2FA / Out-of-Band (OOB) should contact the MatchMove Implementation team and request to set up and configure it in the platform configuration.
2
Set Up a Device Registry
The Device Registry acts as the central address book and security gatekeeper for the entire Biometric 2FA authentication process. When a user initiates a transaction, the system needs to know exactly who they are, what physical device they use, and how to reach that specific device instantly.
Here is a detailed breakdown of what this entails and why each component is critical:
The Core Mapping Components
To make sure the right person gets the right notification on the right phone, the partner’s backend database must link four specific pieces of information together:
- User Identifier (
user.id): This is the unique profile identifier of your customer. When a transaction requires verification, the system flags this specific ID. - Card Identifier (
card.id): This is the unique identifier for your customer's specific card. When a transaction requires verification, the system flags this specific ID. - Device Hardware ID: This is a unique, persistent identifier for the user's physical smartphone or tablet. It ensures the authentication request is bound to a "trusted device." If a malicious actor tries to log in from an unknown phone, the hardware ID won't match the registry, adding a vital layer of fraud prevention.
- Push Tokens (FCM/APNs): These are the digital routing addresses provided by Google and Apple. You cannot send a push notification directly to a phone number. You must send a payload to Apple or Google's servers using this token, and they will relay it to the user's phone.
- FCM (Firebase Cloud Messaging): The routing service used for Android devices.
- APNs (Apple Push Notification service): The routing service used for iOS devices.
3
Build App UI & Biometric Integration
This step bridges the gap between the complex security happening in the background and the actual experience your customer has on their phone. By bundling the user interface (UI) with the biometric security engine, you ensure that approving a transaction is both frictionless and highly secure.
Here is a detailed breakdown of how the visual and technical elements come together:
The User Interface (UI) Components
The partner is responsible for building clear, intuitive screens within their existing mobile app to handle the lifecycle of Out-of-Band (OOB) authentication:
- The Biometric Enablement Screen: Before any of this works, the user must opt-in. You need to build a screen that explains the benefits of biometric approvals and asks for their permission to enable it. Biometric login MUST be enabled as the primary login option for your application.
- The Biometric Login Prompt: The visual prompt that asks the user to scan their face or fingerprint when they open the app to approve a transaction.
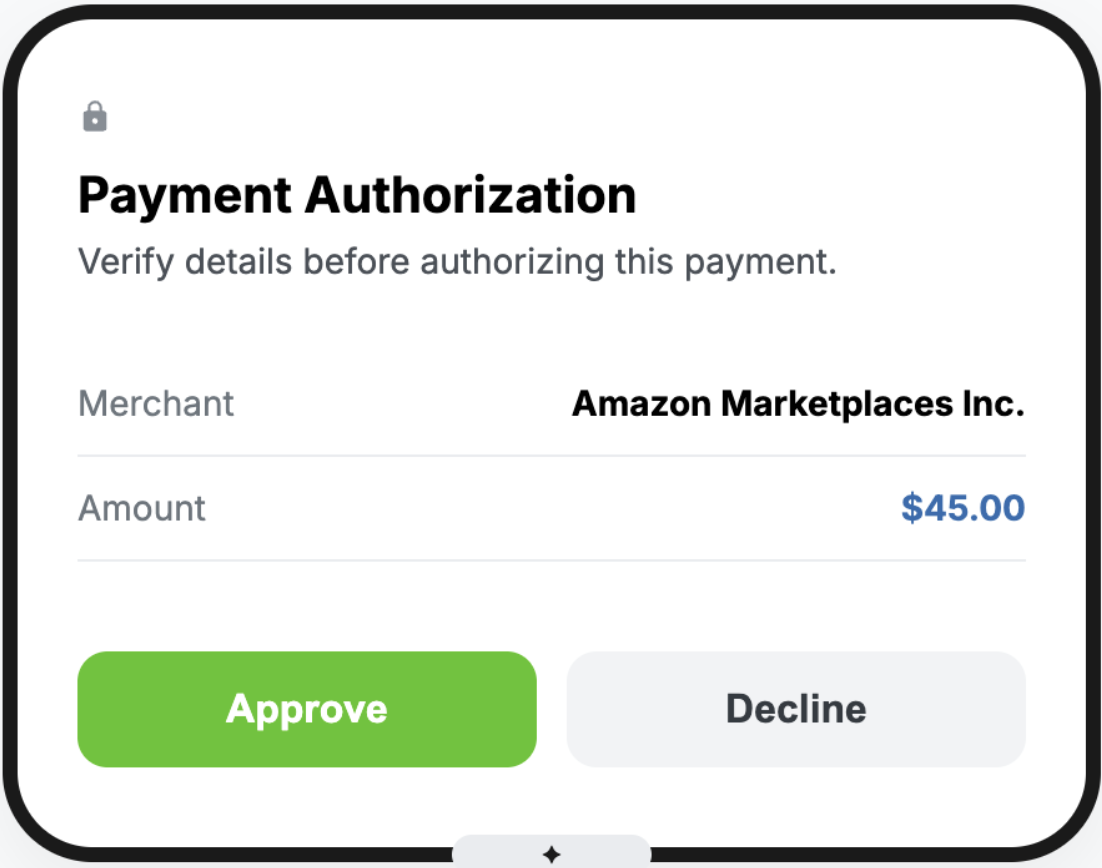
- The Transaction Authentication Screen: Once authenticated, the user must see exactly what they are approving. This screen needs to clearly display critical context:
- Merchant Name
- Transaction Amount and Currency
- Date and Time
- Approve / Decline Buttons: Prominent, unmistakable calls to action so the user can make their final decision.
The Biometric Security Engine
The UI is just the surface; the actual verification is powered by integrating the native software development kits (SDKs) provided by Apple and Google.
- Native OS Integration: The partner app must tie into Face ID / Touch ID (for iOS using the LocalAuthentication framework) and BiometricPrompt (for Android).
- Local Verification: It is crucial to understand that biometric data (the scan of the face or fingerprint) never leaves the user's physical device. This local validation protects user privacy and ensures that even if your servers were compromised, no biometric data could be stolen. The app simply asks the phone's operating system, "Is this the registered owner?" The OS performs the scan locally and returns a simple "Yes" or "No" (a cryptographic token) to your app.
4
Subscribe to the 3DS Authentication webhook
Once the service is enabled in the configuration, partners must subscribe to the webhook event CARDS.3DS.AUTHENTICATION.
This webhook will deliver a payload containing the card ID and transaction 3DS from a payment authentication request.
Upon receipt of the CARDS.3DS.AUTHENTICATION webhook, the partner must consume the payload and prepare to dispatch a push notification to the cardholder.
Sample webhook payload
{
   "entities": {
       "card": {
           "id": "13d3f36e3cd6ce50e1c46b2158a60a43",
           "type": "demodebitpcard"
       },
       "user": {
           "email": "john.smith@matchmove.com",
           "id": "db6c498690d3430eac38d8ad0738c9ca",
           "mobile": "1934943504",
           "mobile_country_code": "91"
       },
       "transaction": {
           "network": "Master",
           "transaction_amount": "3.00",
           "transaction_currency": "AUD",
           "merchant": {
               "merchant_name": "Merchant ABC"
           },
           "authentication": {
               "id": "019bc664-2a59-7c00-ae12-dc48404fb84d",
               "created_at": "2026-01-16T18:40:11+08:00",
               "expires_at": "2026-01-16T18:50:11+08:00",
               "method": "oob",
               "challenge_priority": 1,
               "retry_count": "0",
               "details": {
                   "type": "biometrics",
                   "code": "2345234534534"
               }
           }
       }
   },
   "entity_id": "019bc664-2a59-7c00-ae12-dc48404fb84d",
   "entity_type": "CARD",
   "event_timestamp": "2026-01-16T10:40:13Z",
   "message_id": "019bc664-30b1-7c01-b438-3e0a675546f4",
   "program_code": "{{program_code}}",
   "version": "v2",
   "webhook_event": "CARDS.3DS.AUTHENTICATION"
}
Extract critical routing and tracking identifiers from the webhook payload:
| Identifies which customer is performing the transaction |
| Identifies which card the customer is performing the transaction on |
| The unique authentication code for the current 3DS session. This value must be retained and passed in the subsequent callback payload. |
| The authentication code for the active 3DS session. This value must be retained and passed in the subsequent callback payload. |
5
Dispatch a push notification to the cardholder
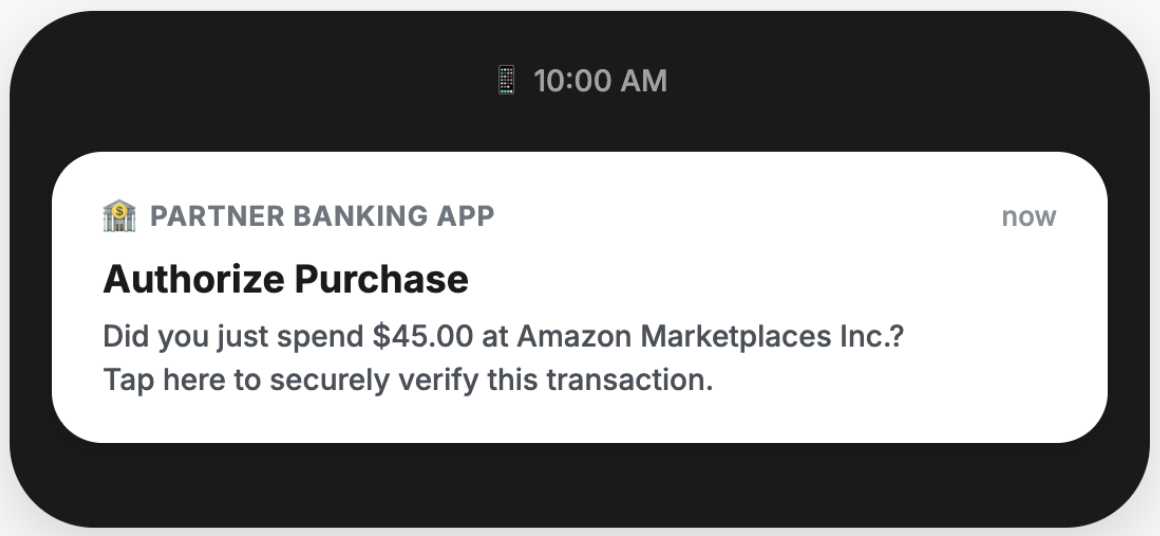
Once you receive and parse the webhook payload, the next step is to alert the cardholder on their registered mobile device. This is achieved by correlating the transaction data with your Device Registry and sending a targeted push notification.
How to Dispatch the Notification
1. Identify the Target Device Extract the entities.user.id (or entities.card.id) from the incoming webhook payload. Query your Device Registry using this identifier to retrieve the user's active Push Token (FCM for Android or APNs for iOS) and verify that they are using a trusted hardware device.
2. Construct the Push Payload Build a push notification payload that includes the necessary transaction details to display to the user, alongside the hidden authentication codes your app will need to process the biometric approval later.
- Contextual Data (For the App UI): Extract the
merchant_name,transaction_amount, andtransaction_currencyso the user knows exactly what they are approving. - Authentication Data (For the API Callback): Include the
authentication.idand theauthentication.details.code.
3. Send the Push Request Dispatch the constructed payload through your mobile messaging infrastructure (e.g., Firebase Cloud Messaging or Apple Push Notification service).
6
App Redirect to Authentication prompt
Once the high-priority push notification is dispatched to the cardholder’s device, your mobile application must handle the incoming payload and immediately guide the user to the biometric authorization screen. This step ensures a frictionless transition from the notification tap to the final payment approval.
Handling the Notification Lifecycle
Depending on the state of the user's mobile device when the push notification arrives, your app should execute the following routing behaviors:
- App in Background / Device Locked: The user receives a system notification. Tapping the notification should open the partner app, prompting the customer to do a biometric prompt before being granted access to the app. Then, instead of showing the standard home screen or app landing page, the deep link must display the Transaction Authentication Screen directly.
- App in Foreground: If the user is actively using your app, you should intercept the high-priority data message and immediately overlay the Transaction Authentication Screen, usually presented as an in-app modal, to avoid disrupting their active session while prioritizing the transaction.
The Cardholder Experience
When a user taps the push alert, the app guides them through a seamless verification process:
- Identity Verification: The app opens directly into a biometric security check (via Face ID, Touch ID, or biometric prompt).
- Contextual Review: Only after biometric clearance does the app reveal the secure transaction data, showing the exact amount, currency, and merchant involved.
- Final Decision: The user can then confidently finalize the process by selecting a prominent "Approve" or "Decline" button.
7
Execute the Finalization Callback
Immediately after the cardholder selects "Approve" or "Decline," the following sequence must occur:
- Internal Notification: The mobile application alerts the Partner's backend system of the user's decision.
- Trigger API Callback: The Partner's backend transmits the result to Matchmove's Update Transaction Authentication Status API via the POST
/authentications/statusendpoint. - Required Payload: The request must include the
authentication_id, the finalstatus(APPROVED or DECLINED) and theverification_type(FINGERPRINT or FACE_ID). - Error Handling: If the Callback API responds with a 500 Internal Server Error, the partner's system is required to automatically retry the request.
Update Transaction Authentication Status
You can call the Update Transaction Authentication Status (POST /authentications/status) to finalize the transaction authorization.
Update Transaction Authentication Status request
curl --request POST \
--url https://{{cards_base_url}}/{{program_code}}/v2/users/wallets/cards/authentications/status \
--header 'Accept: application/json' \
--header 'Content-Type: application/json' \
--header 'Authorization: ••••••' \
--data '{
    "authentication_id": "019735d1-8af7-7c19-97be-371697e2eb78",
    "status": "APPROVED",
    "authentication_code": "2345234534534",
    "verification_type": "FINGERPRINT"
}'
| String | Unique tracker ID from |
|
| String | User's decision |
|
| String | Authentication code from |
|
| String | Biometric method used |
|
Update Transaction Authentication Status response - 500
In the event that the Transaction Authentication Callback request is met with an HTTP Error 500, the partner should retry the request.
8
Validate your integration
There are simulation APIs available that can be used to test Assisted 3DS Authentication - Biometric 2D in the staging environment.
You can go to the Simulate Assisted 3DS Authentication - Biometric 2FA section to learn more about the simulation procedures.
9
[Optional] SMS fallback mechanism
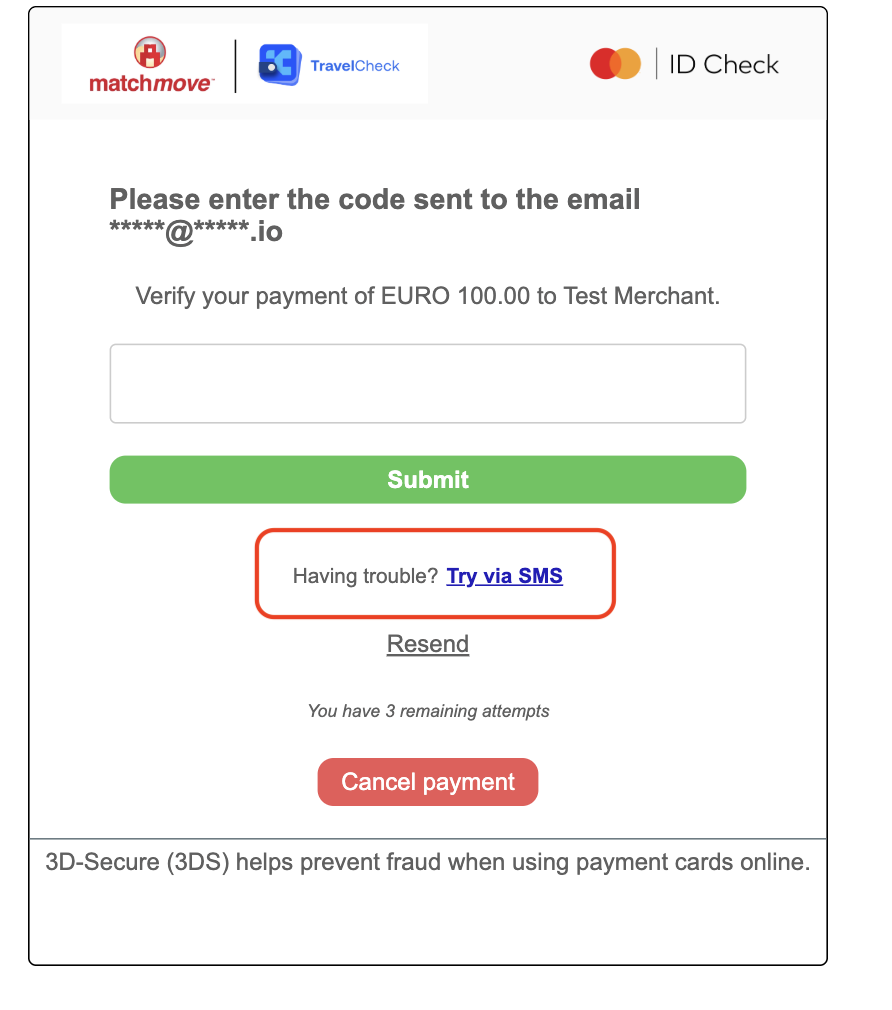
The SMS fallback mechanism provides a backup verification route that users must actively select on the 3DS page. The 3DS UI will automatically change according to which authentication mechanisms are enabled in your program.
In the example below, email is configured as the primary method with SMS enabled as the secondary option. Once the fallback is chosen, the screen updates to prompt for the text message code. This ensures a seamless checkout experience and reduces cart abandonment even if the primary method is unreachable.
Related Links
On this page
- Assisted 3DS authentication - Biometric 2FA