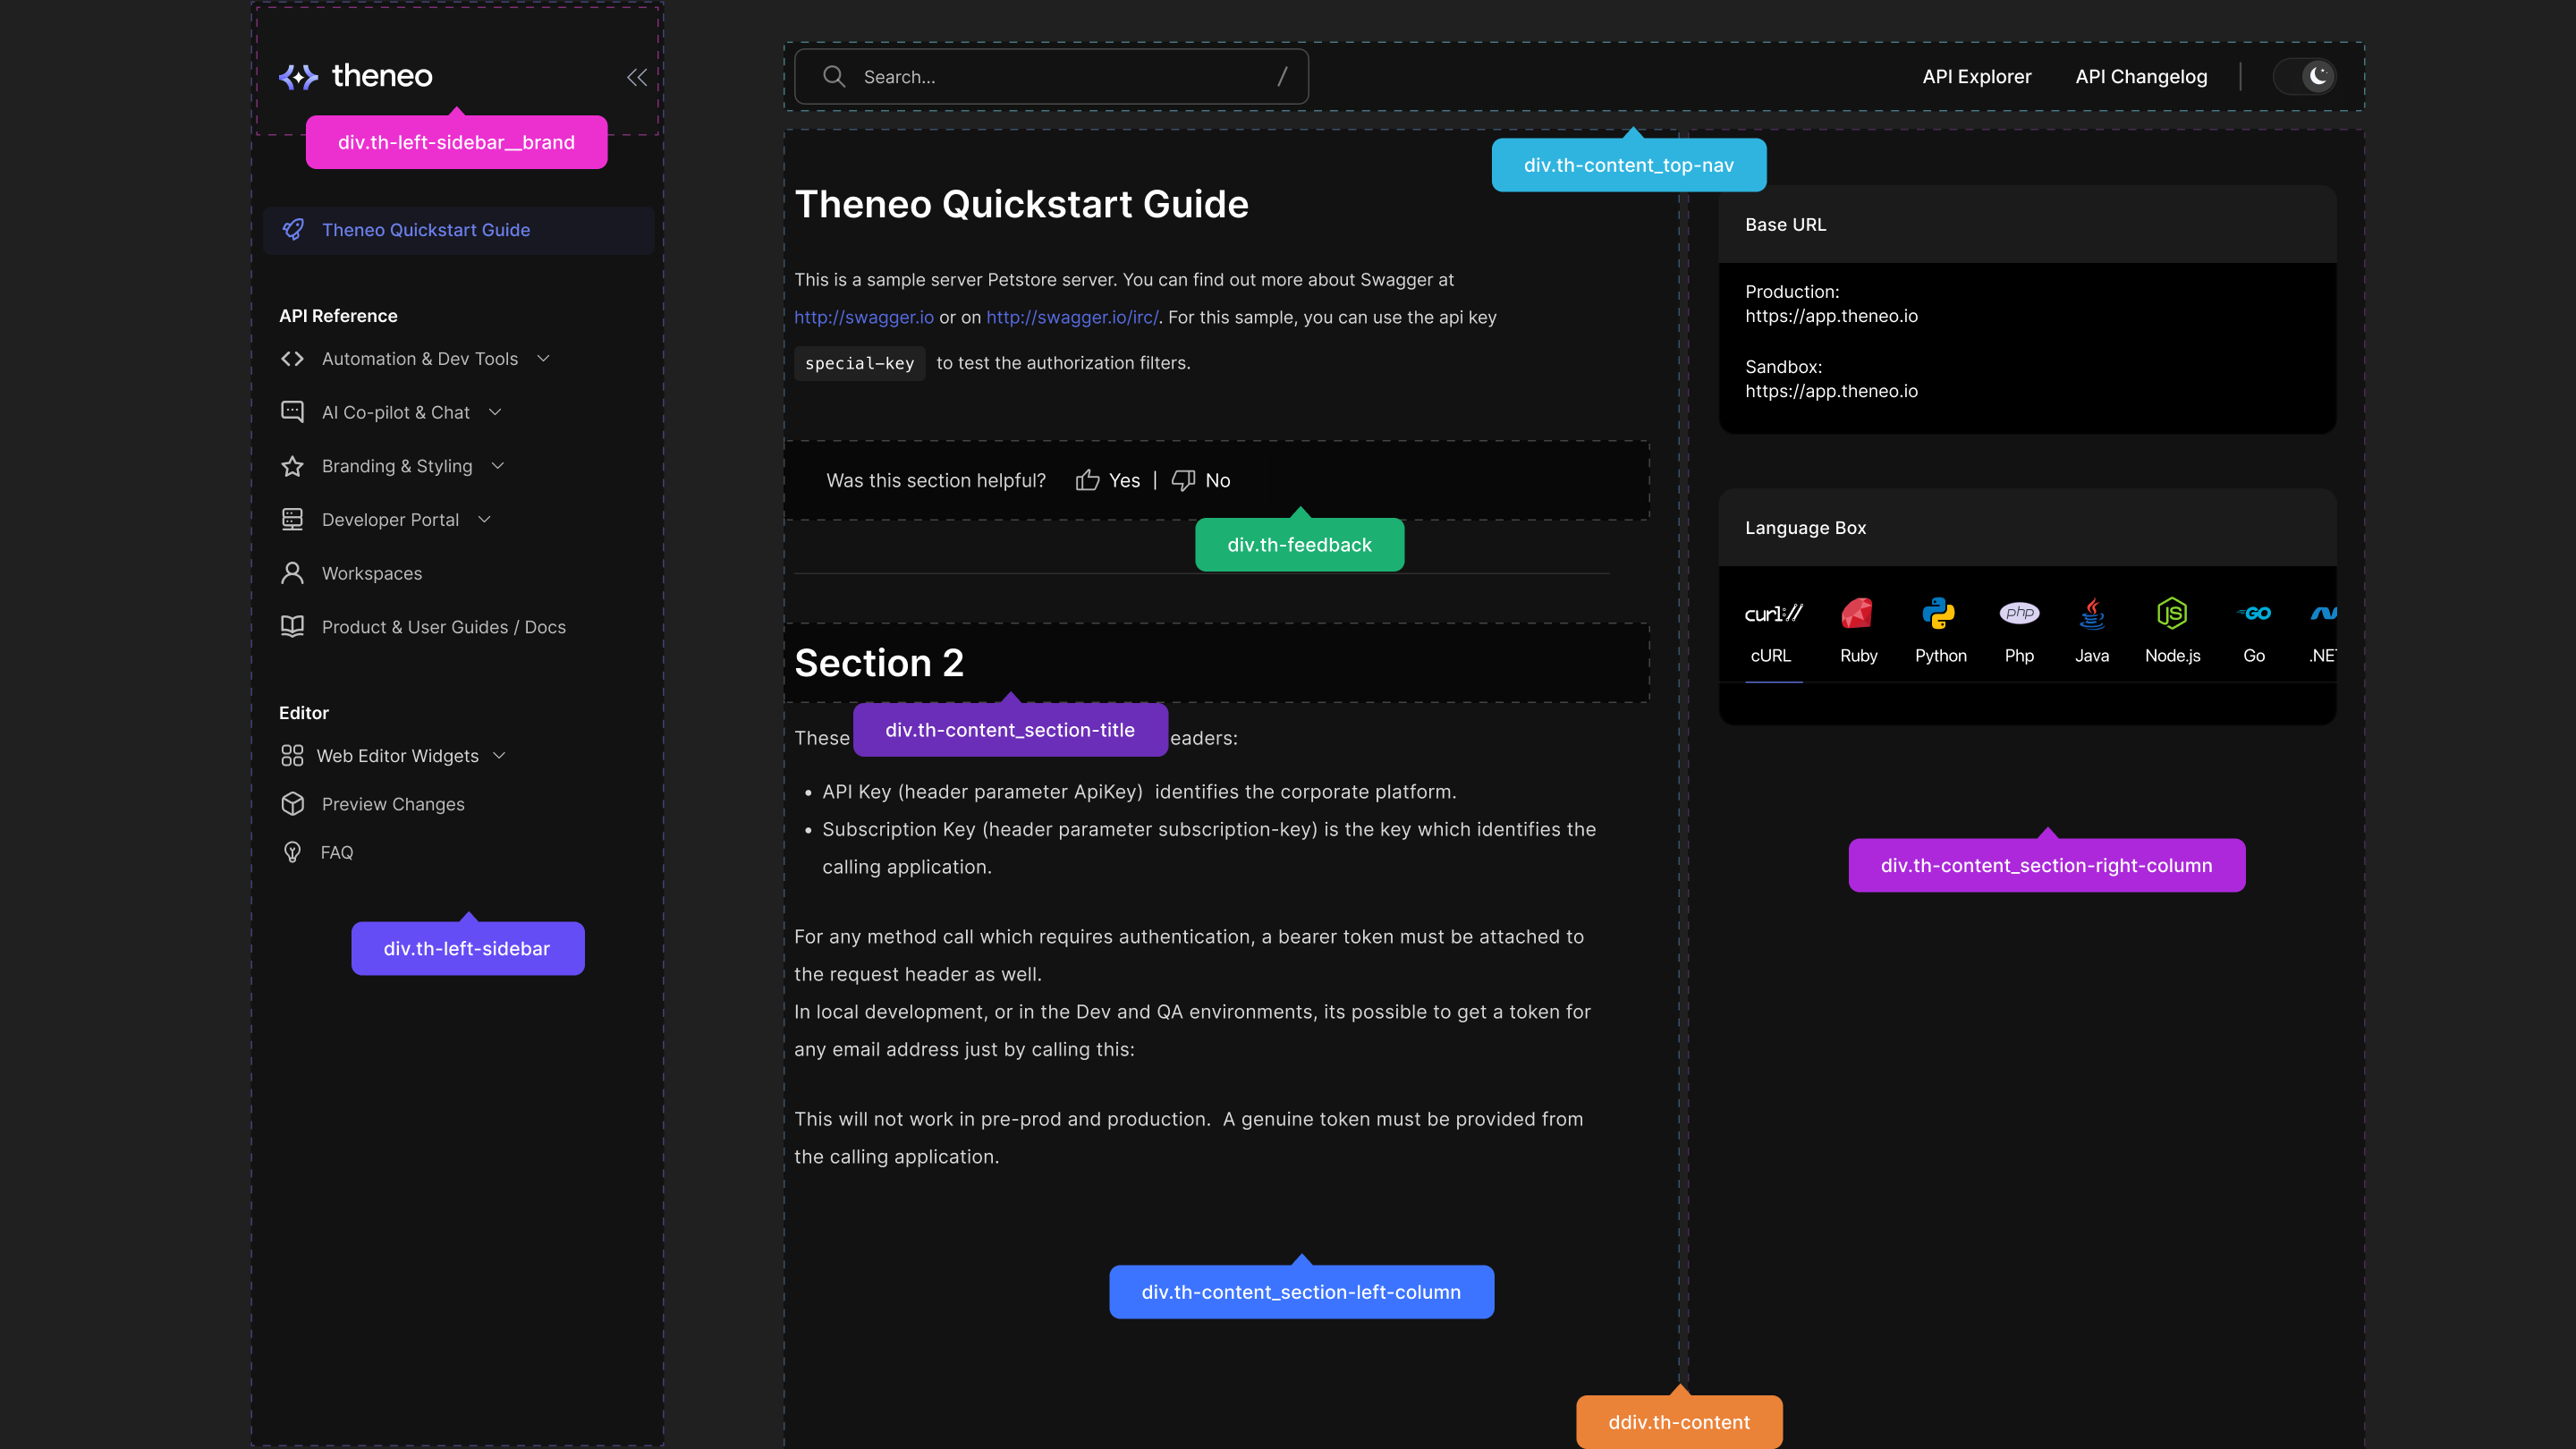
Theneo Quickstart Guide
Creating intuitive, detailed, and easy-to-navigate API documentation has never been easier. Theneo streamlines every step of the process, ensuring that your documentation is not only comprehensive but also interactive and user-friendly. Here's how you can quickly set up your project in Theneo
For API docs, the steps are very simple
When you log into Theneo, start by adding a new project from the homepage. Your project could be an API reference, a developer guide, or any type of documentation you need. Give your project a title, select the appropriate workspace, and you're on your way. For detailed instructions on workspaces, check out our guides
1
Uploading Your API Specification
Theneo accommodates a wide array of API specifications, making it easy to get started regardless of whether you have an existing spec or not. If you're equipped with Swagger, OpenAPI, GraphQL, or another format, the upload process is designed to be straightforward and efficient.
In case you don't have a spec ready, Theneo offers tools to help you create one from scratch. Use our intuitive interface to define your API endpoints directly within the platform. For additional guidance on creating or importing your spec and ensuring format compatibility, check out our guide.
2
Selecting Your AI Co-Pilot
Once your API specification is uploaded, you can harness the power of Theneo's AI Co-pilot to enrich your content. Decide whether you want the AI to fully generate the content, enhance what you've already created, or if you prefer to proceed without AI assistance. If you're looking to streamline the setup, simply click on "Quick Start" to bypass the customization and move directly to publishing.

3
Setting Permissions and Fine-Tuning Your Project
Set your project’s visibility and invite collaborators according to your workflow needs. With Theneo, you can start with a private project and go public when you're ready, seamlessly inviting others to contribute. Manage these settings at any time to fit your project’s development lifecycle.
4
Publish
Utilize Theneo's editing suite for final adjustments before publishing. Preview to ensure everything is perfect and publish to make your documentation available to users. It’s documentation made simple, yet powerful and comprehensive
What made this section unhelpful for you?
API Import & Specs
Theneo provides a robust and versatile range of API formats and collection types to cater to a wide array of integration and development needs. Our platform supports various API formats, including REST, SOAP, GraphQL, and Async APIs, each tailored to different use cases and requirements. Additionally, we offer compatibility with multiple API specification collections, ensuring seamless integration and a streamlined development process. Below is an overview of the supported formats and collections
In the following sections, we'll delve into each of these formats and collections, providing detailed insights and instructions.
API Testing
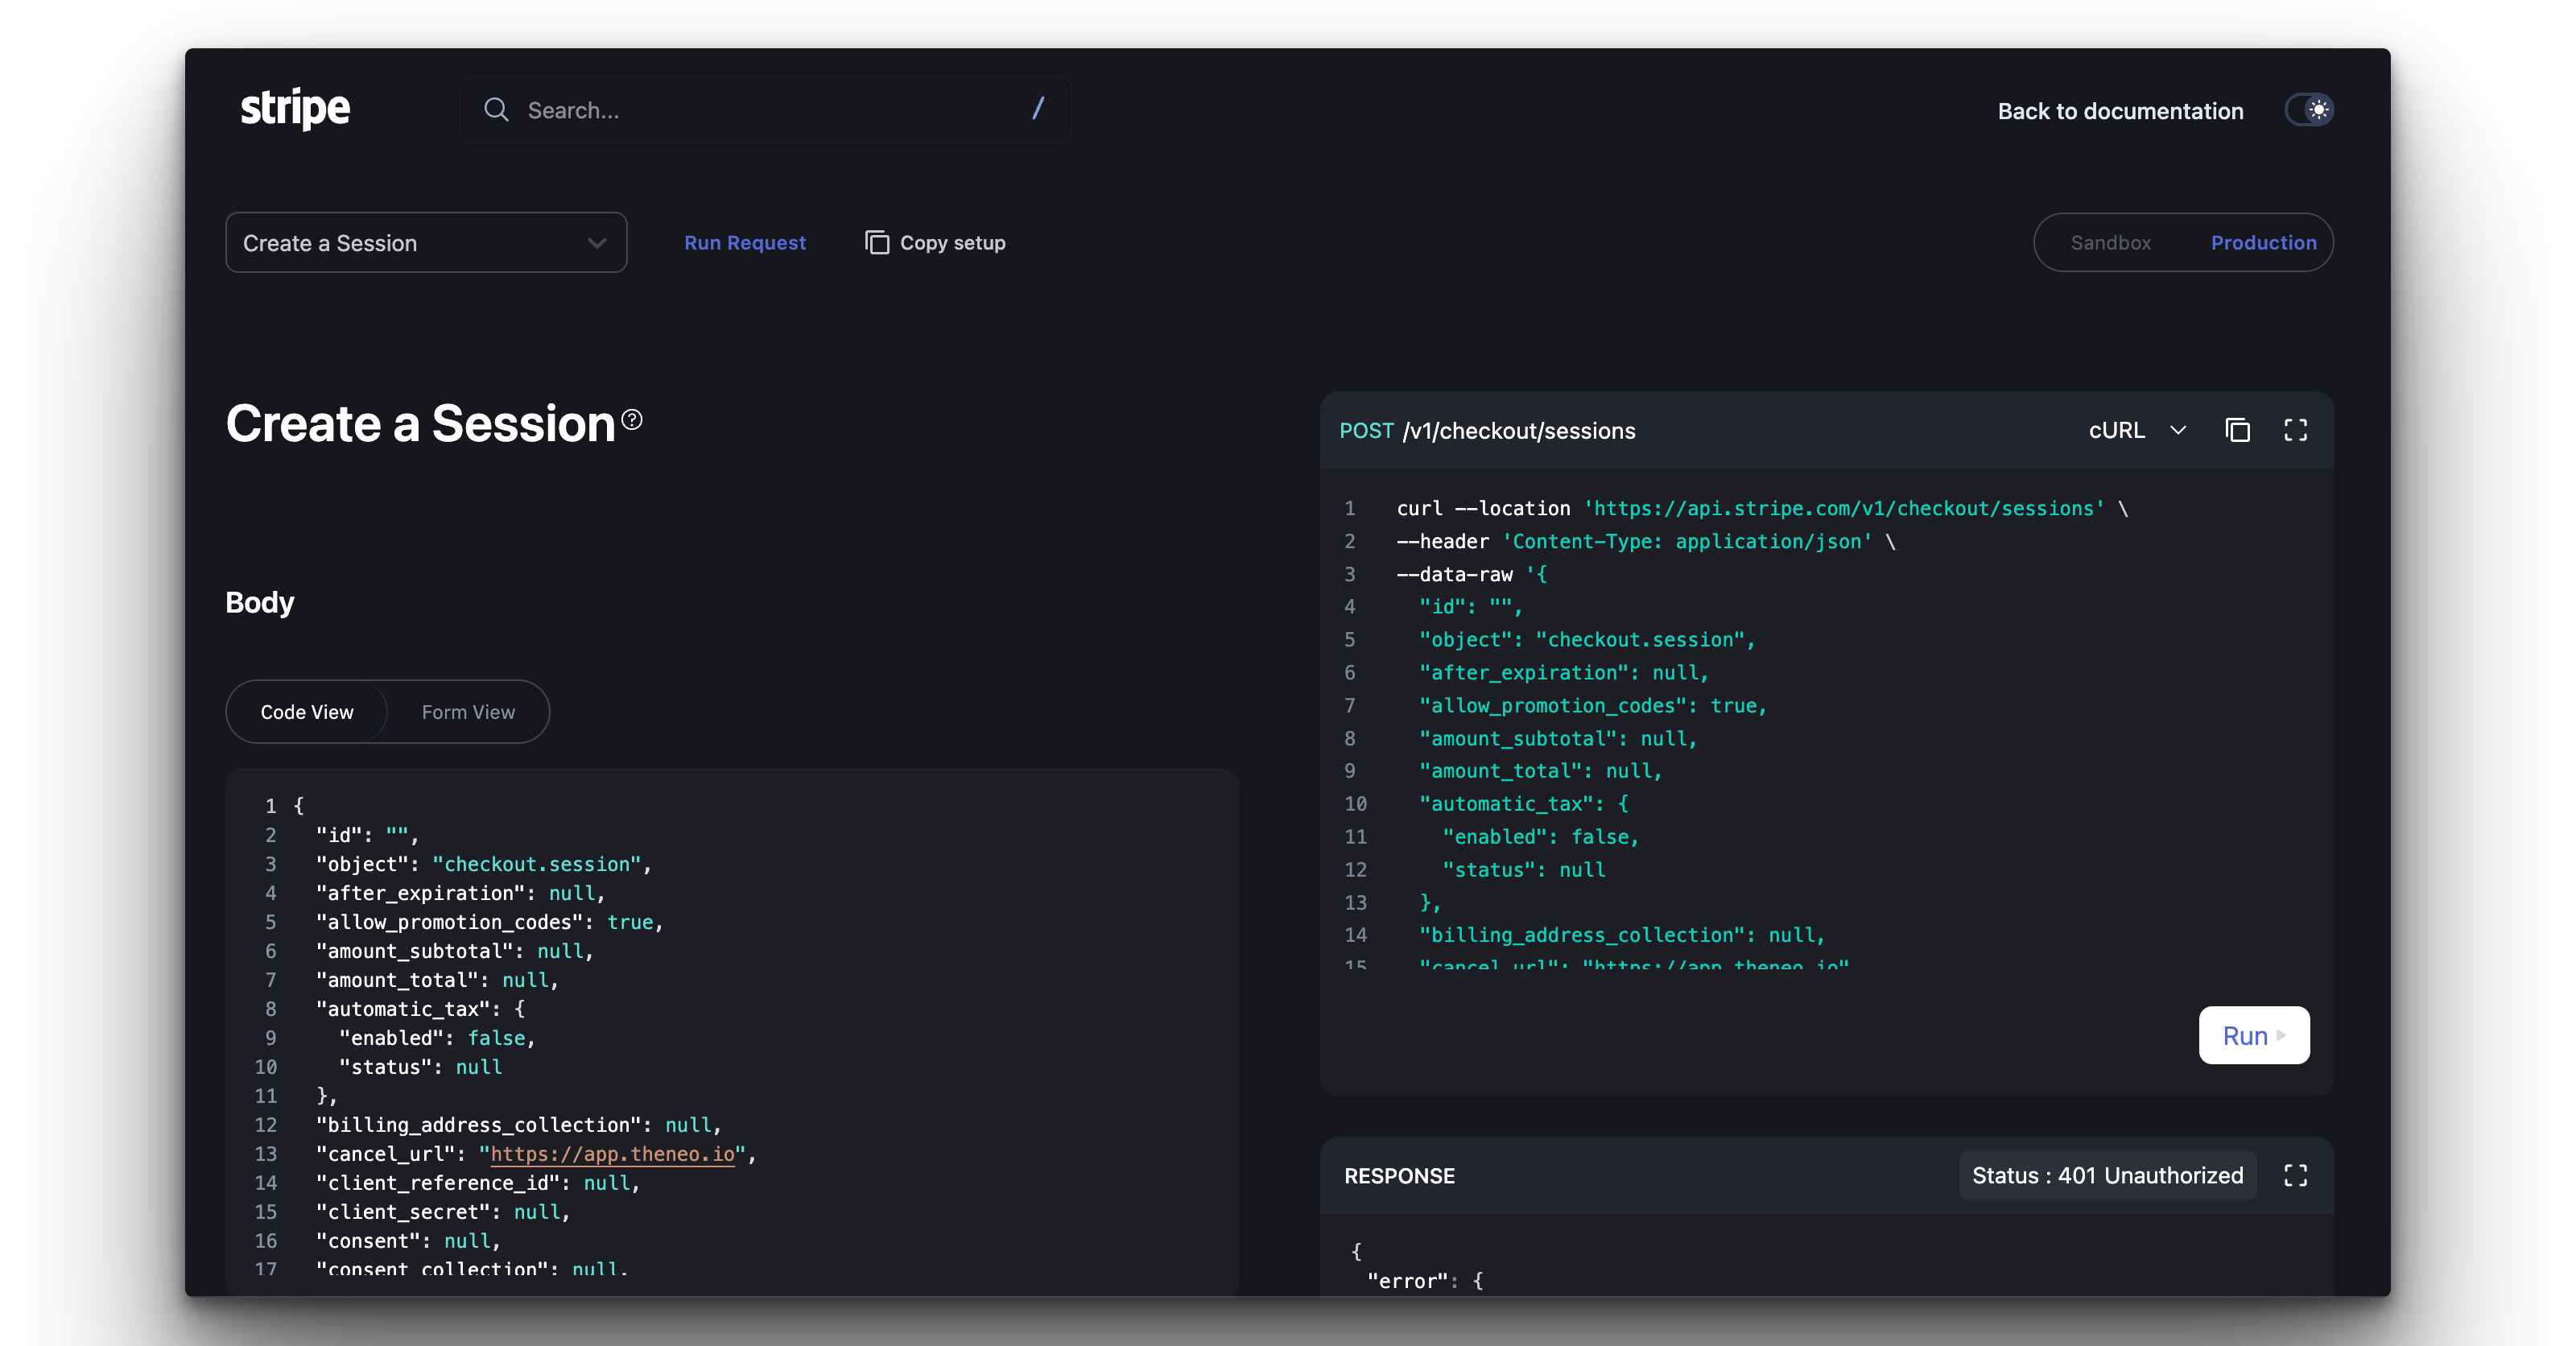
Theneo’s API Explorer is an interactive tool that significantly simplifies the API testing process. It allows users to engage with their APIs in real-time, providing an immersive experience that bridges the gap between technical understanding and practical application. Whether you're a developer or a non-technical user, the API Explorer is designed to offer a seamless and intuitive way to explore and validate API functionality.
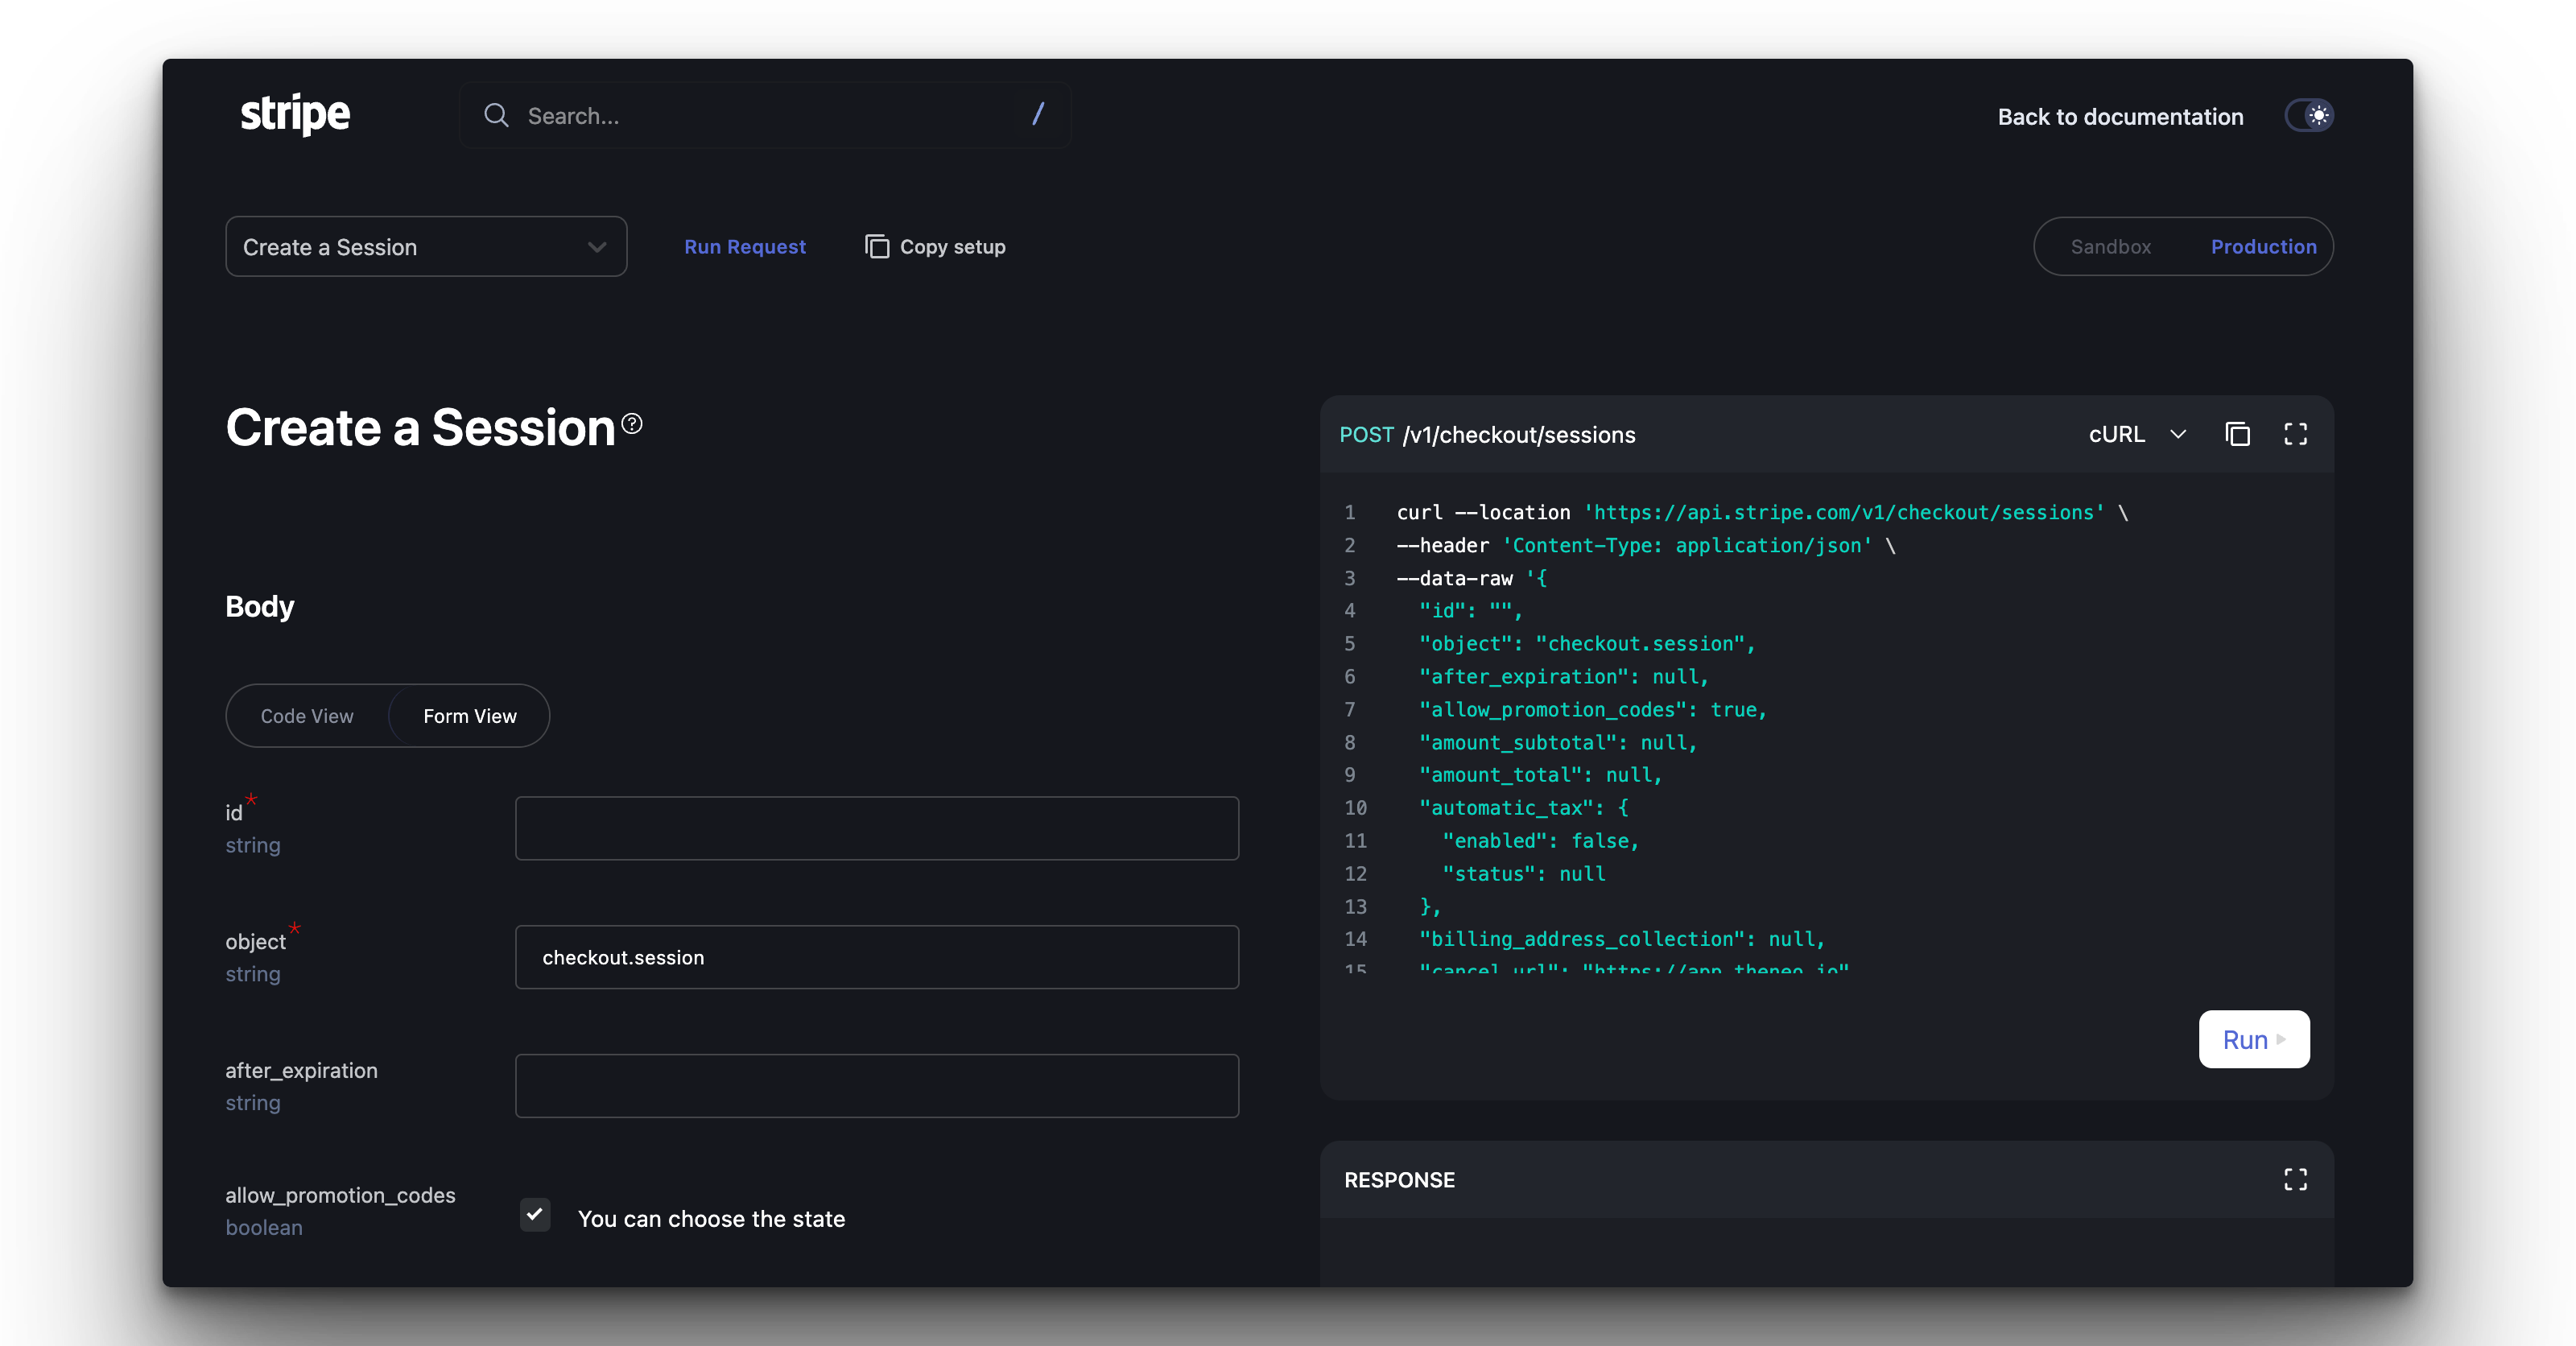
Key Features of API Explorer
Real-Time Testing
- Try in API Explorer Button: Every API request in our documentation includes a “Try in API Explorer” button, allowing instant, live interaction with your APIs.
Environment Selection
- Sandbox and Production Toggle: Test your APIs in a safe sandbox environment or in a live production setting with a simple switch.
User-Friendly Interface
- Form and Code View: Choose your comfort zone—use the Form View for a guided input experience or the Code View to enter your custom code snippets.
Seamless Navigation
- Effortless Section Switching: Navigate between different API sections directly in the Explorer without needing to refer back to the documentation.
Informative Fields
- Field Descriptions: Understand each parameter with clear descriptions and details provided within the Explorer.
Advantages of Using API Explorer
No Setup Required
- Automatic Synchronization: Changes made in the editor or updates from your API spec are automatically reflected in the API Explorer, eliminating the need for manual setup.
Accessible to All User Levels
- Designed for Everyone: The API Explorer is crafted to be accessible to users of all skill levels, breaking down barriers to API testing.
Enhanced Learning and Debugging
- Interactive Learning: By experimenting with live API calls, users can learn more effectively and pinpoint issues on the fly.
API Changelog
Theneo’s Changelog is an essential tool for developers and stakeholders to track changes and updates to your API specifications. This powerful feature not only documents all modifications automatically but also provides an option for users to subscribe and receive email notifications for each update.
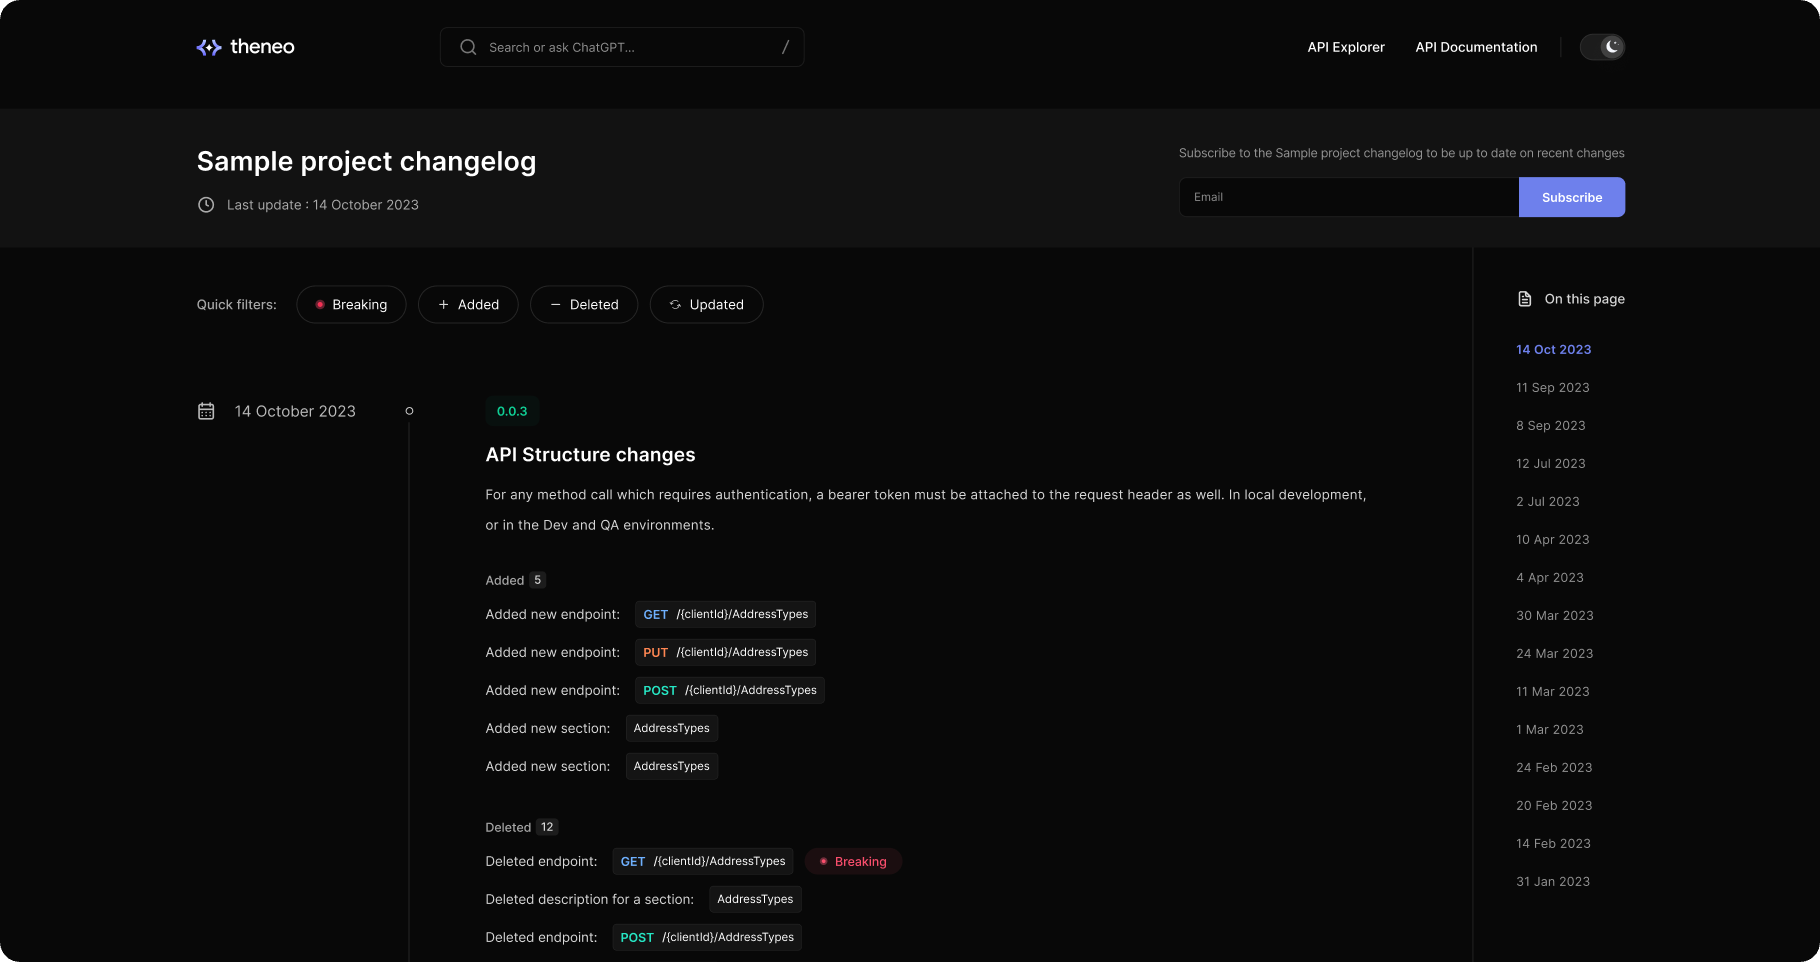
Automated Changelog Documentation
Whenever a new API spec is imported and the "Publish" button is clicked, Theneo detects and summarizes all the changes, such as:
- New endpoints added
- Existing sections updated
- Descriptions modified
- Sections or endpoints removed
These updates are meticulously logged on a dedicated changelog page, providing a detailed version history with timestamps.
Real-Time Email Notifications
How to Subscribe
- Enter Your Email: On the Changelog page, there’s a field to enter your email.
- Hit Subscribe: Click the “Subscribe” button to start receiving updates on the documentation changes.
Benefits of Subscription
- Immediate Awareness: Get notified as soon as changes are published, allowing for prompt action or adaptation in your workflow.
- Convenient Overviews: Email notifications provide a summary of the changes, making it easier to stay informed without needing to check the changelog manually.
- Version Tracking: Keep a close eye on version progression and ensure that all team members and API consumers are aligned with the latest API developments.
FAQ
Can I turn off the changelog?
Yes, the changelog feature in Theneo is optional. You can disable it at any time by going to your project settings, navigating to the 'Features' section, and toggling off the changelog feature.
Can I edit the changelog?
Currently, direct editing of changelog entries is not available. However, if you need to remove a specific entry from the public changelog, you can delete it. To do this, go to your project configuration, select 'Public Changelog,' and use the delete button next to the entry you wish to remove.
Can I edit versions?
The ability to edit version details is a feature that is in the pipeline and will be available soon. This upcoming feature will provide more control over how you document and present version changes in the changelog.
Will this create a new API version if there are breaking changes?
Theneo is designed to track changes meticulously. The functionality to automatically create a new API version upon detecting breaking changes is being developed. When released, it will allow users to manage versions more effectively and ensure that versioning reflects significant changes or updates.
What made this section unhelpful for you?
API Versioning
API versioning in Theneo is designed to be both intuitive and comprehensive, accommodating the natural evolution of your APIs. With Theneo, you can manage and track incremental changes within the same version using the API changelog, as well as create and oversee major version transitions such as moving from v1 to v2 or v3.
Theneo now offers a feature for comprehensive API version management. This feature enables users to meticulously handle different versions of their API, such as v2, v3, and beyond, each with unique statuses and configurations.
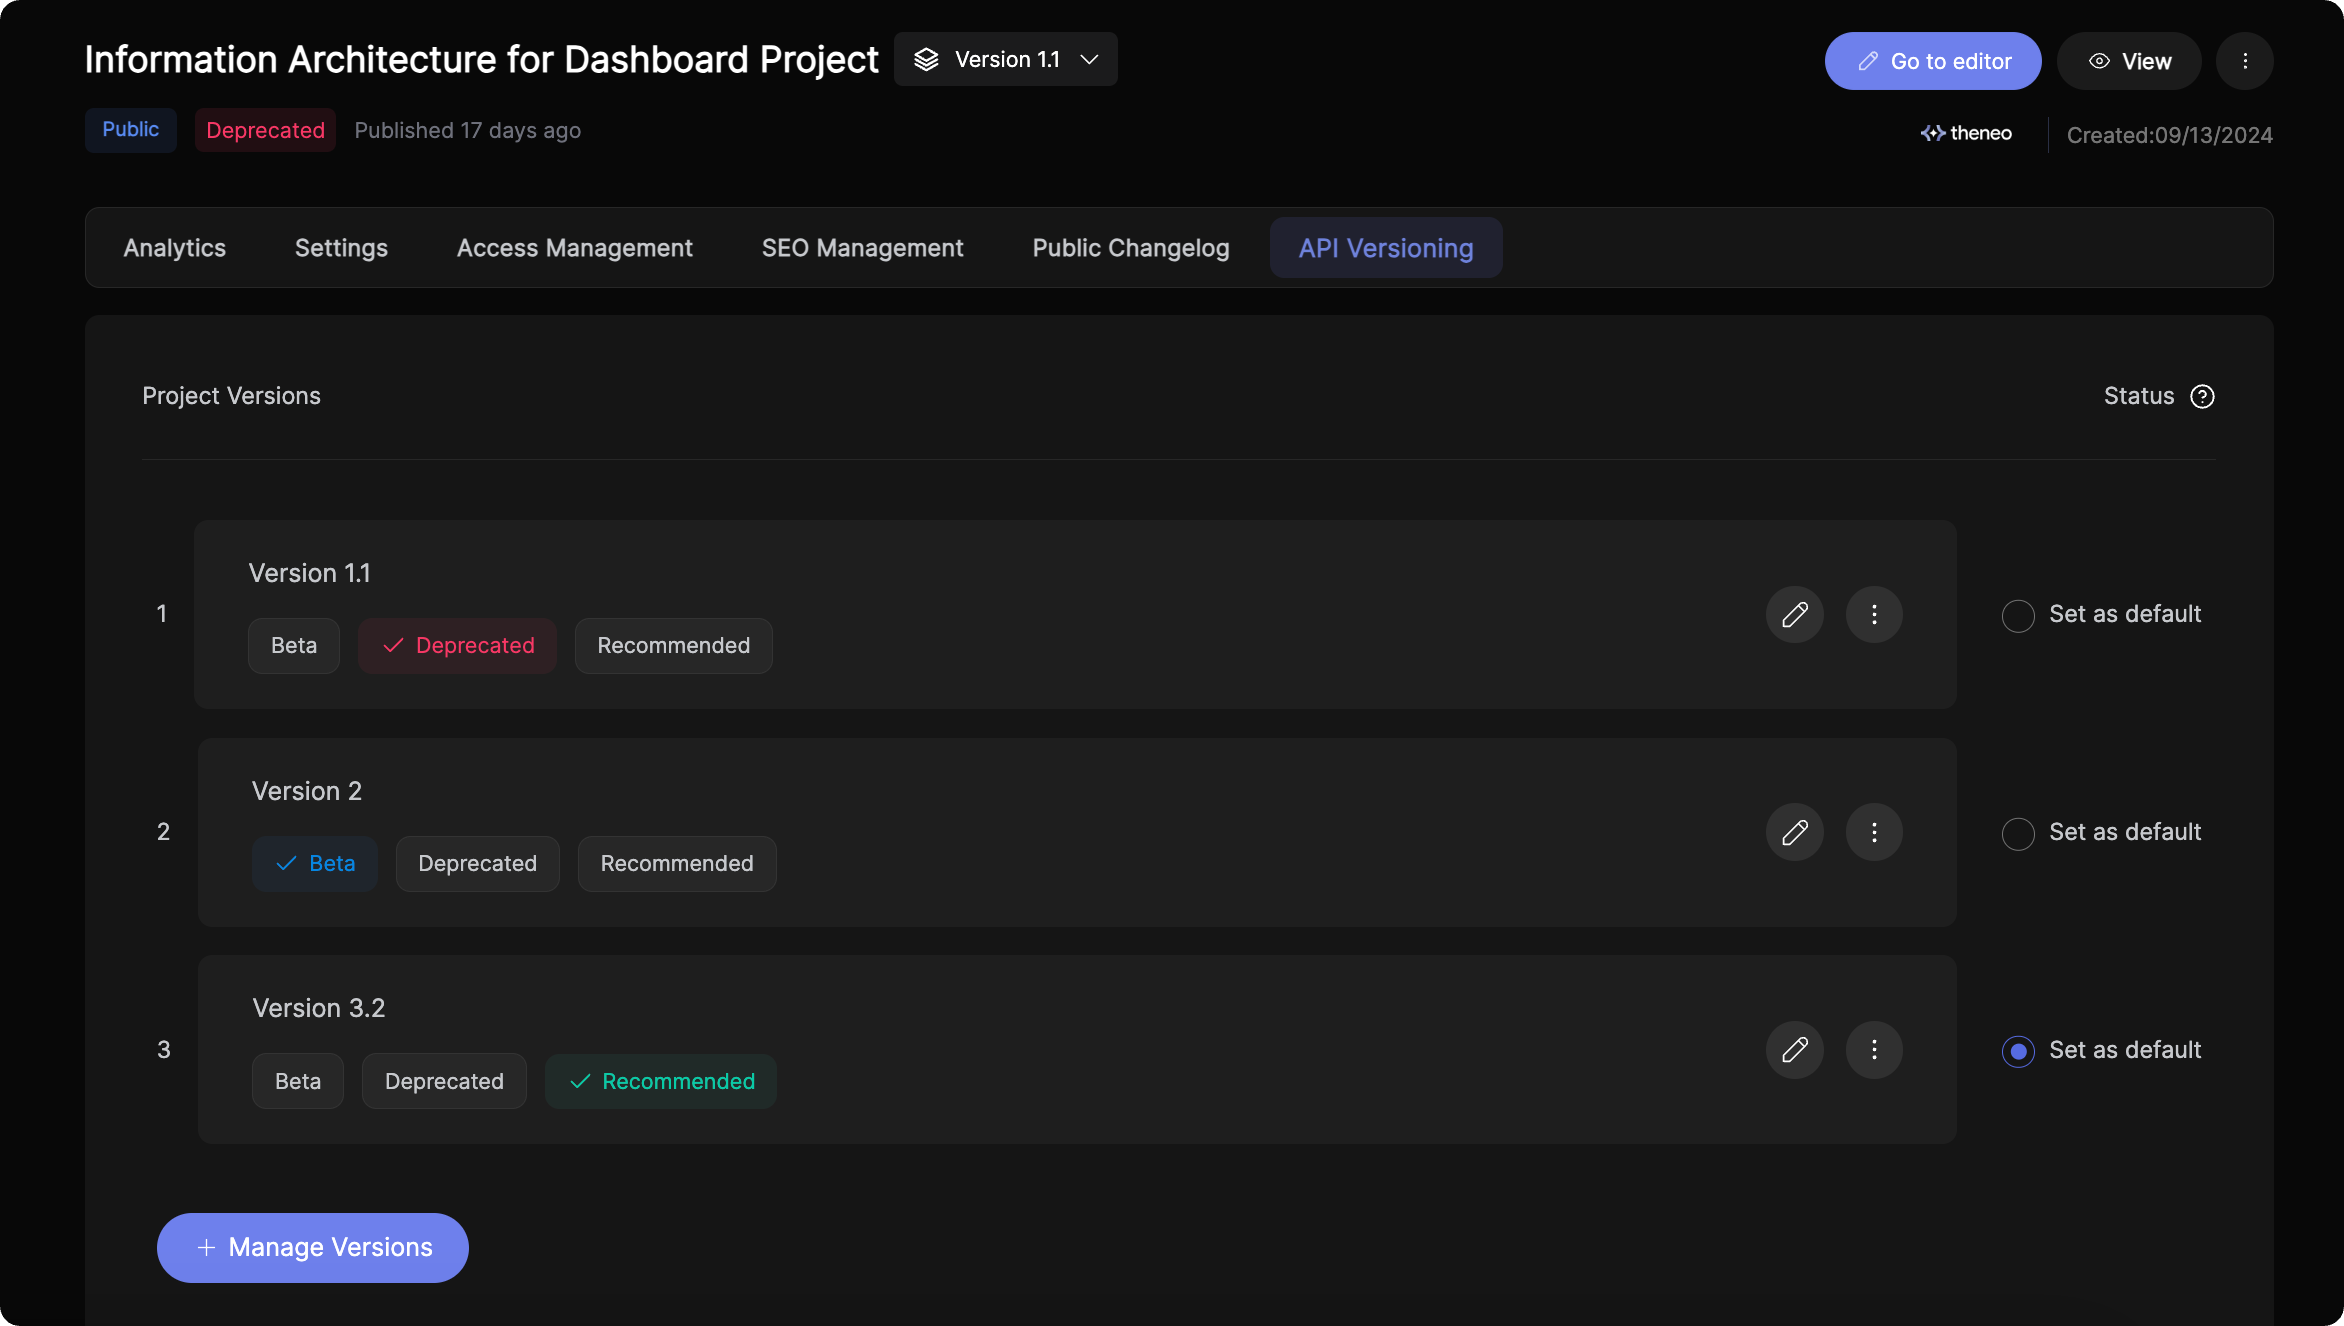
Key Features of API Versioning
- Multiple Versions: Create and manage multiple versions of your API, whether it’s incremental updates or major releases.
- Status Labels: Assign statuses like active, beta, or deprecated to each version, along with any custom attributes you may need.
- Project Configuration: Tailor each API version’s project settings, including access management, SEO settings, and analytics.
- Version-Level Changelogs: Track changes within specific versions, enabling clear communication of updates from 1.1.2 to 1.1.3, etc.
How to Access API Versioning
As this is a beta feature, Theneo invites users to activate API versioning by reaching out to us:
- Contact for Access: Send an email to hello@theneo.io expressing your interest in enabling API versioning for your account.
Utilizing the Versioning Feature
Once API versioning is enabled for your account, you can:
- Add New Versions: Easily add a new version through your project dashboard by importing a new API spec or using an existing one as a base.
- Import Specs: Use the intuitive interface to upload file, link, import from Postman, or input raw text for your API specs.
- Manage Versions: Navigate to the settings menu to manage features, access permissions, SEO optimization, and analytics for each API version.
- Set Version Status: Define the lifecycle stage of each API version with appropriate status labels directly from the project versions screen.
Quick Video Guide
Contact Us
For more information on API versioning and to request access to this beta feature, please contact us at hello@theneo.io. We are committed to supporting you in leveraging this feature to its full potential, ensuring effective management of your API's lifecycle.
Theneo Documentation
A project in Theneo is a robust toolset that allows you to create and manage a wide array of technical content. This can range from API references, SDK documentation, product guides, and much more. Theneo provides an easy and streamlined way to generate API documentation from API collections, allowing you to focus on delivering high-quality, accurate, and up-to-date content.
To create your first project with Theneo:
- Navigate to your dashboard and click on the "Create Project" button.
- Fill in your desired project name in the prompt that appears.
- If you have an API collection at hand, upload it. Theneo accommodates various API types, including REST, GraphQL, AsyncAPI, SOAP, and more.
- Two options await you: "Quickstart" for an instant project creation or "Customize" for a more tailored approach. If you choose the latter, you'll be seamlessly redirected to our AI writer tool.
- The AI writer tool empowers you to fully automate or enhance your project descriptions based on the content of your uploaded API spec. You can opt for complete AI assistance, enhancing only the missing descriptions while retaining your existing content, or skipping AI assistance altogether.
- The final leg of the project creation journey leads you to access control settings. Here, you can fine-tune project access management, invite members as viewers or editors, and put the finishing touches on your project setup.
Editing the generated content or adding new content is a breeze, thanks to Theneo’s intuitive, Notion-like editor. You can easily tweak API requests, methods, properties, descriptions, responses, and much more.
Publishing your First Project
Once you're satisfied with your API reference, the next step is to publish your project. However, it's always a good practice to preview your changes before hitting the publish button.
Here's how you can preview, publish, and share your project:
- Previewing Your Project: From the editor, click on the "Preview" button to see a live view of your changes. Review the content and layout to ensure it matches your expectations. If you need to make further changes, simply click "Back to Editor."
- Publishing Your Project: If you're happy with the preview, click the "Publish" button. Your project is now live and can be viewed by others, depending on the permissions you've set.
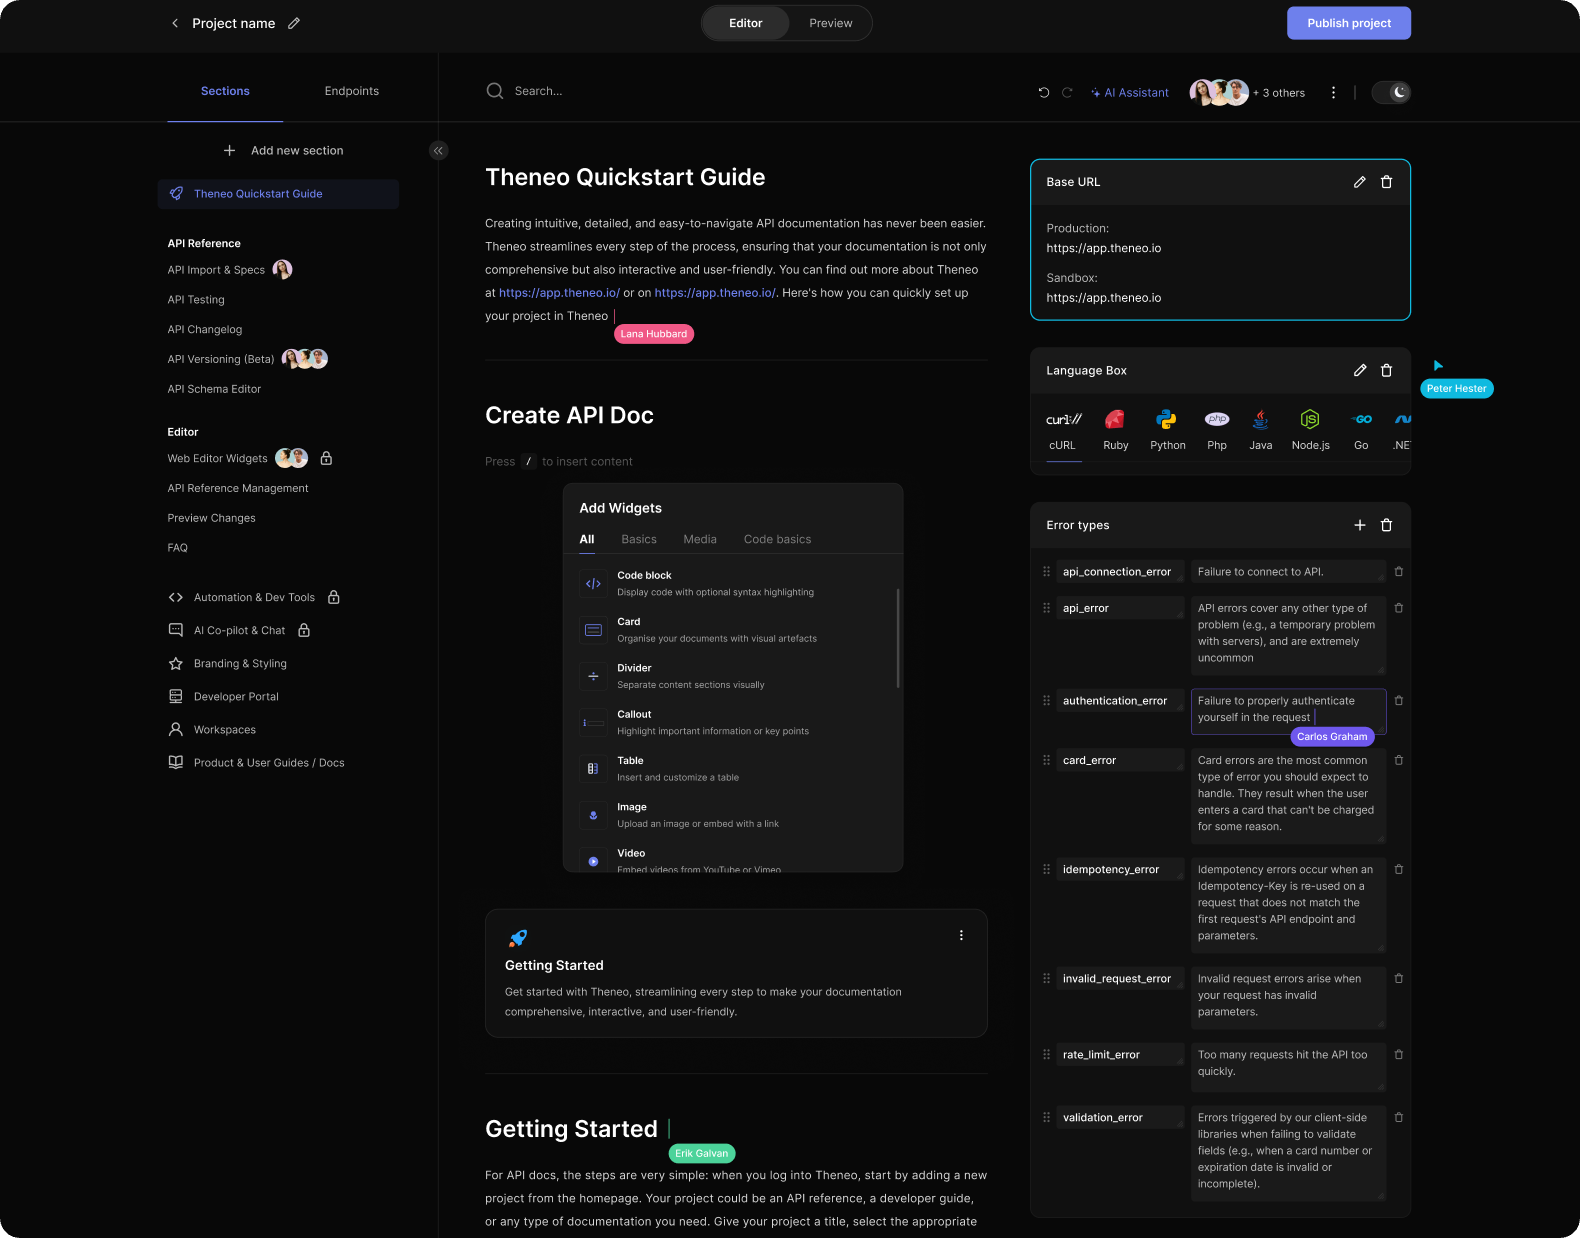
Web Editor Widgets
Theneo's web editor is a rich and intuitive platform, equipped with a variety of widgets that enrich the documentation experience. These widgets add depth and clarity to your API documentation, making it more engaging and informative. You can easily access these widgets by simply going to a new line in the editor and typing /, which brings up the widget options. Let's take a look at the widgets available:
FAQ
Live Collaboration
We know, great collaboration leads to great results, and the Live Collaboration feature in our editor ensures that your team can work together in real-time to achieve just that. Whether you're working on documentation or complex projects, this feature allows multiple users to make updates simultaneously, ensuring everyone is on the same page and contributing effectively. With real-time visibility into who’s editing what, collaboration becomes smooth, organized, and more productive.
Key Features of Live Collaboration
- See Who’s Currently Editing a Section: At any point during the editing process, users can see which collaborators are actively editing a particular section. This visibility helps avoid confusion or duplication of work and ensures smooth collaboration among team members.
- View Where Others Are Editing: Within a section, users can see exactly where their collaborators are making changes in real-time. The editor highlights the text being edited by another user, giving you immediate feedback on what is being updated.
- Cursor Visibility: For greater clarity, the cursor of the collaborator is visible within the section description. This allows users to pinpoint the exact location where edits are happening, ensuring that changes are made in the correct area.
- See Who’s Editing Which Section in the Menu:The menu provides an overview of who is editing which section. Each section that is being actively worked on by a user is marked with their name, making it easy to track where collaborators are focused. This feature enhances coordination, especially in larger documents with multiple sections.
How to Use Live Collaboration
- Start Editing Together: Once users are invited to collaborate on a project or document, they can begin editing simultaneously. As soon as one user starts editing a section, others will see their presence and activity in real-time.
- Communicate with Collaborators: Although the collaboration feature does not include a built-in chat, the real-time presence indicators allow for smooth coordination. Teams can also supplement this feature with external communication tools to enhance collaboration further.
- Conflict Avoidance: Since all users can see who is editing a section, this minimizes the risk of conflicting edits. It helps maintain organized teamwork and ensures that changes are consolidated without accidental overwrites.
What made this section unhelpful for you?
Preview Changes
In Theneo, users can switch to Preview Mode at any time while editing to review the latest changes before publishing. This feature offers several key benefits:
- Accurate Rendering: Preview Mode allows you to see exactly how your content will appear in the final published documentation. This helps ensure that all formatting, layout, and design elements are rendering as intended.
- Section-Specific Previews: You can preview changes for individual sections, ensuring that every detail is correct before publishing. This is especially useful when working on larger documents with multiple sections.
How to Use Preview Mode
- Locate the Switcher Button: In the editor’s header, you’ll find the Editor/Preview switcher button. This is your key to moving between edit mode and preview mode effortlessly.
- Switch to Preview Mode: When you're ready to preview your content, click on the switcher to enter Preview Mode. This will display the most recent version of your documentation as it will appear to end users.
- Preview Specific Sections: You can preview any section of your document to see how changes to that section look.
If the preview meets your expectations, you can move forward by selecting the Publish option. Once confirmed, your documentation will go live with all the updates and enhancements you've applied.
What made this section unhelpful for you?
Github Actions
Step 1: Create Theneo Documentation
Begin by creating a documentation project within Theneo to house your API details.
Step 2: Set Up GitHub Workflow
Configure a workflow in your GitHub repository that will interact with Theneo:
- Create a Workflow File: Add a file named
Theneo.ymlto the.github/workflows/directory in your GitHub repository. This file will define the actions to be taken.
Example Theneo.yml Workflow:
name: Update Documentationon: pull_request: branches: - mainjobs: update-doc: name: Update Theneo Documentation runs-on: ubuntu-latest steps: - run: echo "🎉 The job was automatically triggered by a ${{ github.event_name }} event." - name: Checkout uses: actions/checkout@v4 - name: Setup Node.js uses: actions/setup-node@v4 with: node-version: "18" - name: Update Documentation on Theneo uses: Theneo-Inc/api-documentation@1.8.0 with: FILE_PATH: doc/api.yml PROJECT_SLUG: <project_slug> VERSION_SLUG: <version_slug> WORKSPACE_SLUG: <workspace_slug> SECRET: ${{secrets.SECRET}} AUTO_PUBLISH: true IMPORT_OPTION: merge PARAMETER_DESCRIPTION_MERGE_STRATEGY: keep_new SECTION_DESCRIPTION_MERGE_STRATEGY: keep_old INCLUDE_GITHUB_METADATA: trueLocating Your Theneo Project Slug
To configure GitHub Actions, you'll need your Theneo project slug:
- Go to your project dashboard in Theneo.
- Open the desired project.
- The project slug is part of the URL:
https://app.theneo.io/<workspace-name>/<project-slug>/[version-slug]. - For example, if the URL is
https://app.theneo.io/theneo/github-demo, your project slug isgithub-demo.
Use this project slug for the PROJECT_SLUG variable in your GitHub workflow.
Inputs
Define the following inputs in your workflow file to configure the GitHub Action:
FILE_PATH: The path to your API documentation file within the repository.PROJECT_SLUG: Your project's unique identifier in Theneo, accessible under project settings.VERSION_SLUG: Project version slug to import documentation under a specific version, otherwise default version will be used.WORKSPACE_SLUG: Project workspace slug to import documentation under specific workspace.SECRET: Your Theneo API token for authentication, which can be found in your Theneo profile.IMPORT_OPTION: Determines how to handle the imported documentation. Options includeoverwrite,merge, andendpoints.AUTO_PUBLISH: If set totrue, Theneo will automatically publish the changes. Iffalse, you can review changes in the editor before manual publication.INCLUDE_GITHUB_METADATA: Includes metadata like the GitHub actor in the documentation, visible only in Theneo's editor.SECTION_DESCRIPTION_MERGE_STRATEGY: Merging strategy for section descriptions to keep old descriptions from theneo editor if needed, valid values are keep_new or keep_old.PARAMETER_DESCRIPTION_MERGE_STRATEGY: Merging strategy for parameter descriptions to keep old descriptions from theneo editor if needed, valid values are keep_new or keep_old.
Import Options
Choose how Theneo handles incoming changes:
overwrite: Replaces the current documentation with the new spec entirely.merge: Attempts to merge changes; this is experimental and may append changes in some cases.endpoints: Adds new spec endpoints into a dedicated section for manual arrangement.
Auto-Publish Option
Control the publication of your documentation:
true: Automatically updates the published documentation with the latest changes.false: Allows for a review in Theneo's editor before you decide to publish.
Using Theneo's GitHub Actions integration, the process of maintaining accurate and current API documentation becomes automated, seamless, and efficient. Your team and users gain immediate access to the latest documentation, ensuring everyone is on the same page with API updates and changes.
What made this section unhelpful for you?
Visual Studio Code Extension
Visual Studio Code (VS Code) is a preferred editor for many developers due to its versatility and extensive extension ecosystem. To enhance the experience further, Theneo offers a dedicated VS Code extension that simplifies the creation and previewing of API references directly within the editor.
Installation and Configuration
⬇️ Install the Theneo VS Code Extension
Configure the Extension:
- After installation, sign in to your Theneo account at app.theneo.io
- Once signed in, navigate to your profile settings.
- Within your profile settings, locate and select the "Tools & Integrations" section.
- In the "Tools & Integrations" section, find and copy your Theneo API key.
- In VS Code Extension open the command palette by pressing
Ctrl+Shift+P(orCmd+Shift+Pon Mac). - Type 'Preferences: Open Settings (UI)' and select it.
- Search for Theneo Markdown in the “Extensions” section
- Paste your Theneo API key
New Features
- Ability to export projects from Theneo as markdown and json.
- Ability to Import markdown into theneo directly.
- Ability to merge json to an existing project in Theneo.
Usage
Export Project from Theneo
- Open the command palette by pressing Ctrl+Shift+P (or Cmd+Shift+P on Mac).
- Search for “Theneo: Export Project from Theneo”.
- Select the project from your list of published projects created in Theneo.
- Enter a parent directory to export the project and press enter.
Import Project to Theneo
- Open the command palette by pressing Ctrl+Shift+P (or Cmd+Shift+P on Mac).
- Search for “Theneo: Import Project To Theneo”.
- Enter project name after “/”. example
/project - Choose if you want to publish the document.
Merge Project to Theneo
- Open the command palette by pressing Ctrl+Shift+P (or Cmd+Shift+P on Mac).
- Search for "Theneo: Merge Project To Theneo".
- Copy the relative path to the section that you want to merge.
- Pick the project you are merging with (usually the same project as you exported).
- Go over the changes and press commit merge button.
Open Preview
- Open the command palette by pressing Ctrl+Shift+P (or Cmd+Shift+P on Mac).
- Search for “Theneo: Open Current Project Preview”.
- Type the project name and press enter.
The Theneo VS Code extension streamlines the API documentation process by integrating it into your development environment. It saves time and enhances efficiency by eliminating the need to switch between tools for documentation tasks.
With just a few clicks, you can generate a live preview of your API documentation, making it easier to develop and review your API descriptions and endpoints without ever leaving VS Code.
What made this section unhelpful for you?
Theneo CLI
The Theneo CLI (Command Line Interface) is s a command-line tool for effortless management of the Theneo platform from your terminal. Create, manage, and publish API documentation with ease, all without leaving your command line.
You can find Github repo here or the npm package here → https://www.npmjs.com/package/@theneo/cli
To install the Theneo CLI, use the following command:
npm install -g @theneo/cli@latestThis command installs the Theneo CLI globally on your machine, allowing it to be run from any directory.
Basic Usage
To get started with Theneo CLI, you can use the help command:
theneo helpThis command provides a list of available options and commands:
General Options:
- -V, --version: Outputs the version number of the Theneo CLI.
- -h, --help: Displays help for a specific command.
Primary Commands:
- login: Logs into the Theneo CLI.
- project
<action>:Executes project related commands. - workspace
<action>:Executes workspace related commands. - version
<action>:Executes project version related commands. - help [command]: Provides help for a specific command.
Common Use Cases
1. Logging In
Standard Login:
theneo loginLogin with an API Key:
theneo login --token <theneo-api-key>You can also set the THENEO_API_KEY environment variable.
2. Creating a New Project
 theneo project create --help
Usage: theneo project create [options]

Create new project

Options:
  --name <name>                                  Project name
  --workspace <workspace>                        Enter workspace slug where the project should be created in, if not present uses default
                                                 workspace
  -f, --file <file>                              API file path to import (eg: docs/openapi.yml)
  --link <link>                                  API file URL to create project using it
  --postman-api-key <postman-api-key>            Postman API Key (env: THENEO_POSTMAN_API_KEY)
  --postman-collection <postman-collection>      Postman collection id, you can use multiple times
  --empty                                        Creates empty project (default: false)
  --sample                                       Creates project with sample template (default: false)
  --publish                                      Publish the project after creation (default: false)
  --public                                       Make published documentation to be publicly accessible. Private by default (default:
                                                 false)
  --generate-description <generate-description>  Indicates if AI should be used for description generation (choices: "fill", "overwrite",
                                                 "no_generation", default: "no_generation")
  --profile <string>                             Use a specific profile from your config file.
  -h, --help                                     display help for command
Standard Project Creation:
theneo project createCreating a Project with an API Spec File:
theneo project create --name api-documentation --generate-description overwrite --publish --public --file ./examples/openapi-spec.jsonCreating a Project Using a Link to API Documentation:
theneo project create --name api-documentation --generate-description fill --publish --public --link https://raw.githubusercontent.com/OAI/OpenAPI-Specification/main/examples/v3.0/uspto.jsonCreating a Project from Postman Collections:
theneo project create --name api-documentation --postman-api-key <key> --postman-collection <id-1> --postman-collection <id-2>3. Updating API Documentation from an API Spec File
 Usage: theneo project import [options]

Import updated documentation into Theneo using file, link or postman collection

Note: Published document link has this pattern: https://app.theneo.io/<workspace-slug>/<project-slug>/<version-slug>

Options:
  --project <project-slug>                   Specify the project slug to import updated documentation in
  -f, --file <file>                          API file path to import (eg: docs/openapi.yml)
  --link <link>                              API file URL to create project using it
  --postman-api-key <postman-api-key>        Postman API Key (env: THENEO_POSTMAN_API_KEY)
  --postman-collection <postman-collection>  Postman collection id, you can use multiple times
  --import-type <import-type>                Indicates how should the new api spec be imported (choices: "endpoints", "overwrite", "append", "merge")
  --publish                                  Automatically publish the project (default: false)
  --workspace <workspace-slug>               Workspace slug, where the project is located
  --projectVersion <version-slug>            Project version slug to import to, if not provided then default version will be used
  --keepOldParameterDescription              Additional flag during merging import option, it will keep old parameter descriptions
  --keepOldSectionDescription                Additional flag during merging import option, it will keep old section descriptions
  --profile <string>                         Use a specific profile from your config file.
  -h, --help                                 display help for command
Updating a Project:
theneo project import --file <file> --project <project-slug> --publishImport with merge option
 theneo project import --project <project-slug> \
--workspace <workspace-slug> \
--projectVersion <version-slug> \
--publish \
--file ./api-spec.json \
--import-type merge \
--keepOldParameterDescription \
--keepOldSectionDescription
4. Publishing Documentation
theneo project publish --project <project-slug>5. Deleting a Project
theneo project delete --project <project-slug>6. Project Version
 theneo version --help
Usage: theneo version [options] [command] <action>

Project version related commands

Options:
  -h, --help        display help for command

Commands:
  list [options]    List project versions
  create [options]
  delete [options]
  help [command]    display help for command
7. Create Version
 Usage: theneo version create [options]

Options:
  --name <name>                              Name of the version
  --project <project-slug>                   Project slug to create version for
  --workspace <workspace-slug>               Workspace slug where the project is
  --previousVersion <previous-version-slug>  Previous version slug to duplicate the content from
  --profile <string>                         Use a specific profile from your config file.
  -h, --help                                 display help for command
8. Add ChangeLog subscriber
 Usage: theneo version add-subscriber [options]

Add a subscriber for project changelog

Options:
  --project <project-slug>                  Project slug
  --workspace <workspace-slug>              Workspace slug
  --projectVersion <previous-version-slug>  Project version slug
  --email <email>                           Email of the new subscriber to change log
  --profile <string>                        Use a specific profile from your config file.
  -h, --help                                display help for command
Use the main branch changes
Clone the repository
git clone git@github.com:Theneo-Inc/theneo-tools.gitInstall packages
nvm use npm installInstall the CLI
npm run cliRun the CLI
theneo helpChange theneo API endpoint
- Using environment variable
THENEO_API_KEY=<theneo-api-key> THENEO_API_URL=https://api.theneo.io THENEO_APP_URL=https://app.theneo.io \theneo <command>- Using theneo config file and profile
theneo login --profile <profile-name> --token <theneo-api-key> --api-url https://api.theneo.io --app-url https://app.theneo.iocheck the config file at .config/theneo/config
9. Export project data in Markdown format - Beta
 Usage: theneo export [options]

Options:
  --project <project-slug>         project slug
  --projectVersion <version-slug>  Version slug
  --workspace <workspace-slug>     Enter workspace slug where the project should be created in, if not present uses default workspace
  --profile <string>               Use a specific profile from your config file.
  --dir <directory>                directory location where the project will be exported (default: "docs")
  --publishedView                  By default it will export data from editor, pass this flag to get published project data (default: false)
  -h, --help                       display help for command
10. Import project data from Markdown files
 Usage: theneo import [options]

Update theneo project from generated markdown directory

Options:
  --project <project-slug>         project slug
  --workspace <workspace-slug>     Enter workspace slug where the project should be created in, if not present uses default workspace
  --dir <directory>                Generated theneo project directory
  --publish                        Automatically publish the project (default: false)
  --projectVersion <version-slug>  Version slug
  --profile <string>               Use a specific profile from your config file.
  -h, --help                       display help for command
11. Exporting an OpenAPI Spec - Beta feature
You can export your Theneo docs into an openAPI spec, by running the following command
theneo export --openapi --format jsonYou can use the same exporting options as in the regular export command.
12. Create a new project from markdown files
 Usage: theneo create [options]

Options:
  --dir <directory>             directory location where the project will be exported
  --name <project-name>         project name
  --workspace <workspace-slug>  Enter workspace slug where the project should be created in, if not present uses default workspace
  --profile <string>            Use a specific profile from your config file.
-h, --help display help for commandtheneo create --dir <directory> --name <project-name>Best Practices and Tips
- Always check the version of the Theneo CLI installed with
theneo -Vto ensure compatibility with your project. - Utilize the
--helpoption regularly to understand the specific requirements of each command. - Regularly update your Theneo CLI to access the latest features and bug fixes.
- When importing or updating projects, ensure your API specifications are correctly formatted to avoid errors.
What made this section unhelpful for you?
Theneo SDK
The Theneo SDK is a comprehensive package designed to simplify API requests to the Theneo API, enabling easy integration of Theneo's features into various applications. This SDK abstracts the complexities of API requests and error handling, providing a more streamlined experience for developers.
This documentation provides an overview of the Theneo SDK package. The SDK package includes classes and interfaces for working with the Theneo API. Theneo is a platform for managing API documentation projects.
You can find the Github repository here
Install
Install the Theneo SDK Package: Use npm to install the Theneo SDK package:
npm install @theneo/sdkUsage
To use the Theneo SDK package, import the necessary classes and interfaces, and create an instance of the Theneo class with the required options. Then, you can use the methods provided by the SDK to interact with the Theneo API.
import { Theneo, TheneoOptions, Result, Workspace, ProjectSchema, CreateProjectOptions } from "@theneo/sdk";// Define Theneo optionsconst options: TheneoOptions = { apiKey: "YOUR_API_KEY"};// Create a Theneo instanceconst theneo = new Theneo(options);// Example usageasync function listWorkspaces() { const result: Result<Workspace[]> = await theneo.listWorkspaces(); if (result.ok) { const workspaces: Workspace[] = result.unwrap(); console.log("Workspaces:", workspaces); } else { console.error("Error:", result.unwrap()); }}// Create a new projectasync function createProject() { const projectOptions: CreateProjectOptions = { name: "My Project", workspace: { key: "workspace-key" }, publish: true, isPublic: true, data: { // Specify the data source using one of the following attributes: // 1. Import from a file // file: '/path/to/api-documentation.json', // 2. Import from a URL // link: 'https://example.com/api-documentation.json', // 3. Import from a text string // text: 'API documentation content as a string', // 4. Import from a Postman collection // postman: { // apiKey: 'YOUR_POSTMAN_API_KEY', // collectionIds: ['collection-id-1', 'collection-id-2'], // }, } as ApiDataInputOption }; const result: Result<CreateProjectResponse> = await theneo.createProject(projectOptions); if (result.ok) { const createdProject: CreateProjectResponse = result.unwrap(); console.log("Created Project:", createdProject); } else { console.error("Error:", result.unwrap()); }}// Use the SDK methods as neededlistWorkspaces();createProject();Import api document
An example demonstrating how to use the importProjectDocument method to import API documentation to an existing project using the Theneo SDK in TypeScript:
import { Theneo, TheneoOptions, Result, ImportProjectOptions, ImportResponse, ApiDataInputOption } from "@theneo/sdk";// Define Theneo optionsconst options: TheneoOptions = { apiKey: "YOUR_API_KEY"};// Create a Theneo instanceconst theneo = new Theneo(options);// Define the import optionsconst importOptions: ImportProjectOptions = { projectId: "project-id", // Replace with the actual project ID publish: true, // Set to true if you want to publish the imported data data: { // Specify the data source using one of the following attributes: // 1. Import from a file // file: '/path/to/api-documentation.json', // 2. Import from a URL // link: 'https://example.com/api-documentation.json', // 3. Import from a text string // text: 'API documentation content as a string', // 4. Import from a Postman collection // postman: { // apiKey: 'YOUR_POSTMAN_API_KEY', // collectionIds: ['collection-id-1', 'collection-id-2'], // }, } as ApiDataInputOption};// Import API documentation to the projectasync function importApiDocumentation() { const result: Result<ImportResponse> = await theneo.importProjectDocument(importOptions); if (result.ok) { const importResponse: ImportResponse = result.unwrap(); console.log("Imported API Documentation:", importResponse); } else { console.error("Error:", result.unwrap()); }}// Run the import functionimportApiDocumentation();In this example:
- We first create an instance of the
Theneoclass and provide the necessary API key in theoptionsobject. - We define the import options in the
importOptionsobject. You should replace'project-id'with the actual ID of the project where you want to import the API documentation. - Inside the
dataattribute ofimportOptions, you can specify the source of the API documentation to be imported. You can choose one of the four options:- Import from a file (specify the file path).
- Import from a URL (specify the URL).
- Import from a text string (specify the content as a string).
- Import from a Postman collection (specify the Postman API key and collection IDs).
- The
publishoption is set totrueto indicate that the imported data should be published. - The
importApiDocumentationfunction uses theimportProjectDocumentmethod to perform the import operation.
Make sure to replace the placeholder values ('YOUR_API_KEY', 'project-id', and any others) with your actual API key and project details before running the code.
TheneoOptions (Interface)
Options for initializing the Theneo SDK.
apiKey?: string: API key for the Theneo application.apiClientName?: string: Name of the client making the API call (default istheneo-sdk:${SDK_VERSION}).baseApiUrl?: string: Theneo API URL.baseAppUrl?: string: Theneo APP URL.
Theneo (Class)
The main class for interacting with the Theneo API.
Methods
listWorkspaces(role?: UserRole): Promise<Result<Workspace[]>>: Lists workspaces available for a user.listProjects(): Promise<Result<ProjectSchema[]>>: Lists user projects.deleteProjectById(projectId: string): Promise<Result<void>>: Deletes a project by ID.publishProject(projectId: string): Promise<Result<PublishProjectResponse>>: Publishes API documentation for a project.getPreviewProjectLink(projectId: string): stringreturns preview link for a project.importProjectDocument(options: ImportProjectOptions): Promise<Result<ImportResponse>>: Imports API documentation to an existing project.createProject(options: CreateProjectOptions): Promise<Result<CreateProjectResponse>>: Creates a new project on the Theneo platform.getDescriptionGenerationStatus(projectId: string): Promise<Result<ProjectCreationStatusResponse, Error>>: Gets the description generation status for a project.waitForDescriptionGeneration(projectId: string, progressUpdateHandler?: DescriptionGenerationProgressHandler, retryTime?: number, maxWaitTime?: number): Promise<Result<never>>: Waits for description generation to finish.static listPostmanCollections(postmanApiKey: string): Promise<Result<PostmanCollection[]>>: Returns list of Postman Collections using the api key
DescriptionGenerationType (Enum)
An enum representing different types of description generation options.
FILL: Generate descriptions for parameters that do not have descriptions already.OVERWRITE: Overwrite descriptions for parameters that do not have descriptions already.NO_GENERATION: Do not generate descriptions for parameters that do not have descriptions already.
DescriptionGenerationProgressHandler (Type)
A callback function type that receives the progress percentage of description generation.
PostmanImportOptions (Interface)
Options for importing Postman collections.
apiKey: string: Postman API key.collectionId: string[]: Postman collection IDs to be imported.
WorkspaceOption (Interface)
Workspace options for creating a project.
key?: string: Workspace key.id?: string: Workspace ID.
ApiDataInputOption (Interface)
Data input options for creating a project. Specify only one of the following attributes.
file?: fs.PathLike: Path to a file containing API documentation.link?: URL: URL to a file containing API documentation.text?: string: API documentation as a string.postman?: PostmanImportOptions: Postman collection to create the project from.
CreateProjectOptions (Interface)
Options for creating a project.
name: string: Project name.workspace?: WorkspaceOption: Workspace where to create the project (default is the user's default workspace).publish?: boolean: Indicates if the project should be published after creation (default isfalse).isPublic?: boolean: Indicates if the project is public (default isfalse).data?: ApiDataInputOption: API documentation data for creating the project.sampleData?: boolean: Indicates if the project should be created with sample data.descriptionGenerationType?: DescriptionGenerationType: Description generation type.progressUpdateHandler?: DescriptionGenerationProgressHandler: Callback for description generation progress.
ImportOption (Enum)
An enum representing different options for importing API specifications.
ENDPOINTS_ONLY: Import only the endpoints.OVERWRITE: Overwrite existing data.MERGE: Merge with existing data.
ImportProjectOptions (Interface)
Options for importing API documentation to an existing project.
projectId: string: Project ID.publish: boolean: Indicates if the imported data should be published.data: ApiDataInputOption: API documentation data for importing.importOption?: ImportOption: Import option.
PublishProjectResponse (Interface)
A response object after publishing a project.
projectKey: string: Project key.baseUrlRequired: boolean: Indicates if a base URL is required.companySlug: string: Company slug.publishedPageUrl: string: URL of the published page.
CompanySchema (Interface)
A schema representing company information.
id: string: Company ID.name: string: Company name.slug: string: Company slug.corporateId: string: Corporate ID.createdAt: Date: Creation date.updatedAt: Date: Last updated date.createdBy: string: Created by user.
ProjectSchema (Interface)
A schema representing project information.
id: string: Project ID.name: string: Project name.key: string: Project key.isPublic: boolean: Indicates if the project is public.companyId: string: Company ID.createdAt: Date: Creation date.company: CompanySchema: Company information.
CreateOtherTypeOfDocOptions (Interface)
Options for creating other types of documentation.
docType: string: The type of documentation.gettingStartedSections?: { introduction: boolean; prerequisites: boolean; quickStart: boolean; resources: boolean; }: Sections for getting started documentation.sdk?: { overview: boolean; supportedLibraries: boolean; sampleCode: boolean; troubleshooting: boolean; }: SDK documentation sections.faq?: { generalInfo: boolean; authentication: boolean; usage: boolean; billing: boolean; }: FAQ sections.
CreatedProjectStatusEnum (Enum)
An enum representing different statuses for a created project.
CREATED: Project creation completed successfully.STARTED: Project creation is in progress.FINISHED: Project creation finished successfully.ERROR: Project creation encountered an error.CREATED_WITHOUT_AI_GENERATION: Project created without AI generation.
CreateProjectResponse (Interface)
A response object after creating a project.
projectId: string: Project ID.publishData?: PublishProjectResponse: Information about the published project.
ProjectCreationStatusResponse (Interface)
A response object containing information about the status of project creation.
name: string: Project name.key: string: Project key.creationStatus: CreatedProjectStatusEnum: Creation status.descriptionGenerationProgress: number: Progress of description generation in percentage.updatedAt: string: Last updated date.
ImportResponse (Interface)
A response object after importing a project.
collectionId: string: Collection ID.publishData?: PublishProjectResponse: Information about the published project.
UserRole (Enum)
An enum representing different user roles.
ADMIN: Administrator.EDITOR: Editor.
Workspace (Interface)
Workspace information.
workspaceId: string: Workspace ID.name: string: Workspace name.slug: string: Workspace slug/key.role: UserRole: Workspace role.isDefault: boolean: Indicates if the workspace is the default workspace.isCorporate: boolean: Indicates if the workspace is corporate.isSubscribed: boolean: Indicates if the workspace is subscribed.
ResultImp (Abstract Class)
An abstract class representing the result of an operation that can either succeed with a value of type T or fail with an error of type E.
Methods
unwrap(): T: Unwraps the successful result value. If the result is an error, this method will throw an exception.unwrap<U>(ok: (value: T) => U): U: Unwraps the successful result value and applies a function to it.unwrap<U, V>(ok: (value: T) => U, err: (error: E) => V): U | V: Unwraps the result value and applies functions based on whether it's a success or an error.unwrap<U>(ok: (value: T) => U, err: (error: E) => U): U: Unwraps the result value and applies a function based on whether it's a success or an error.map<U>(ok: (value: T) => U): Result<U, E>: Transforms a successful result into a new result with a different value type.map<U, F extends Error>(ok: (value: T) => U, err: (error: E) => F): Result<U, F>: Transforms a result into a new result with different value and error types.chain<X>(ok: (value: T) => Result<X, E>): Result<X, E>: Chains a function that produces a new result based on the success value.chain<X>(ok: (value: T) => Result<X, E>, err: (error: E) => Result<X, E>): Result<X, E>: Chains functions for both success and error cases.chain<X, U extends Error>(ok: (value: T) => Result<X, U>, err: (error: E) => Result<X, U>): Result<X, U>: Chains functions with different error types.
OkResult (Class)
A class representing a successful result.
Properties
value: T: The successful value.
ErrResult (Class)
A class representing an error result.
Properties
error: E: The error object.
Ok(value: T): Result(Function)
A function for creating a successful result.
value: T: The value to wrap in the result.
Err(error?: E): Result (Function)
A function for creating an error result.
error?: E: An optional error object.
ResponseSchema (Interface)
An interface representing the schema of a response object.
data: T: The data payload of the response.message: string: A message associated with the response.
What made this section unhelpful for you?
Bitbucket
Bitbucket’s collaborative environment is ideal for teams to manage their codebase. Integrating Bitbucket with Theneo ensures your API documentation stays in sync with your repository changes. Here’s how to set up Bitbucket integration:
Usage
Step 1: Create Theneo Documentation
Initiate your API documentation by creating a project on the Theneo platform.
Step 2: Configure Bitbucket Pipeline
Incorporate Theneo's automation into your Bitbucket repository:
- Add a Pipeline: Integrate Theneo's pipeline into your
bitbucket-pipelines.ymlfile to update your Theneo documentation with each repository update. - Configure the Pipeline: Use the snippet below in your
bitbucket-pipelines.ymlfile to set up the pipeline.
codescript: - pipe: theneo1/theneo-pipeline:0.2.1 variables: API_DOCUMENT_PATH: "path/to/api/spec.yaml" THENEO_PROJECT_KEY: "your-project-slug" THENEO_API_KEY: "your-api-key"Variables for Bitbucket Pipeline:
API_DOCUMENT_PATH: The path to your API spec within your repository.THENEO_PROJECT_KEY: The unique slug of your Theneo project. Find this in your Theneo project URL:https://app.theneo.io/[workspace-name]/[project-slug]. For example, if your Theneo project URL ishttps://app.theneo.io/theneo/bitbucket-demo, thebitbucket-demois your project slug.THENEO_API_KEY: Your Theneo API key, which you can generate from the Theneo website.
Prerequisites for Bitbucket Integration
- An established API documentation project on Theneo.
- A generated API key from your Theneo account.
- Your API documentation file located within your Bitbucket repository.
After setting up the Bitbucket pipeline with the appropriate Theneo variables, your API documentation will automatically reflect changes pushed to your repository. This seamless integration facilitates an up-to-date and accurate representation of your API for developers and stakeholders.
AI Co-pilot & Chat
Theneo's AI CoPilot revolutionizes the way API documentation is created by automating the generation and enhancement of content. With options for full AI assistance, enhancing existing content, or opting out, it provides a flexible approach to building comprehensive documentation. The AI CoPilot functions as an expert technical writer, offering precise descriptions for parameters, ensuring consistency and reducing manual effort.
The integration of ChatGPT brings interactive, conversational AI to Theneo's documentation, allowing users to ask questions directly within the docs. This feature, powered by the sophisticated GPT-4 turbo, is easily enabled in settings and offers users instant, contextual answers to both technical and business inquiries, elevating the documentation's utility and user engagement.
Together, Theneo's AI CoPilot and ChatGPT integration deliver a dynamic duo of content generation and user interaction, simplifying the documentation process and enhancing the end-user experience.
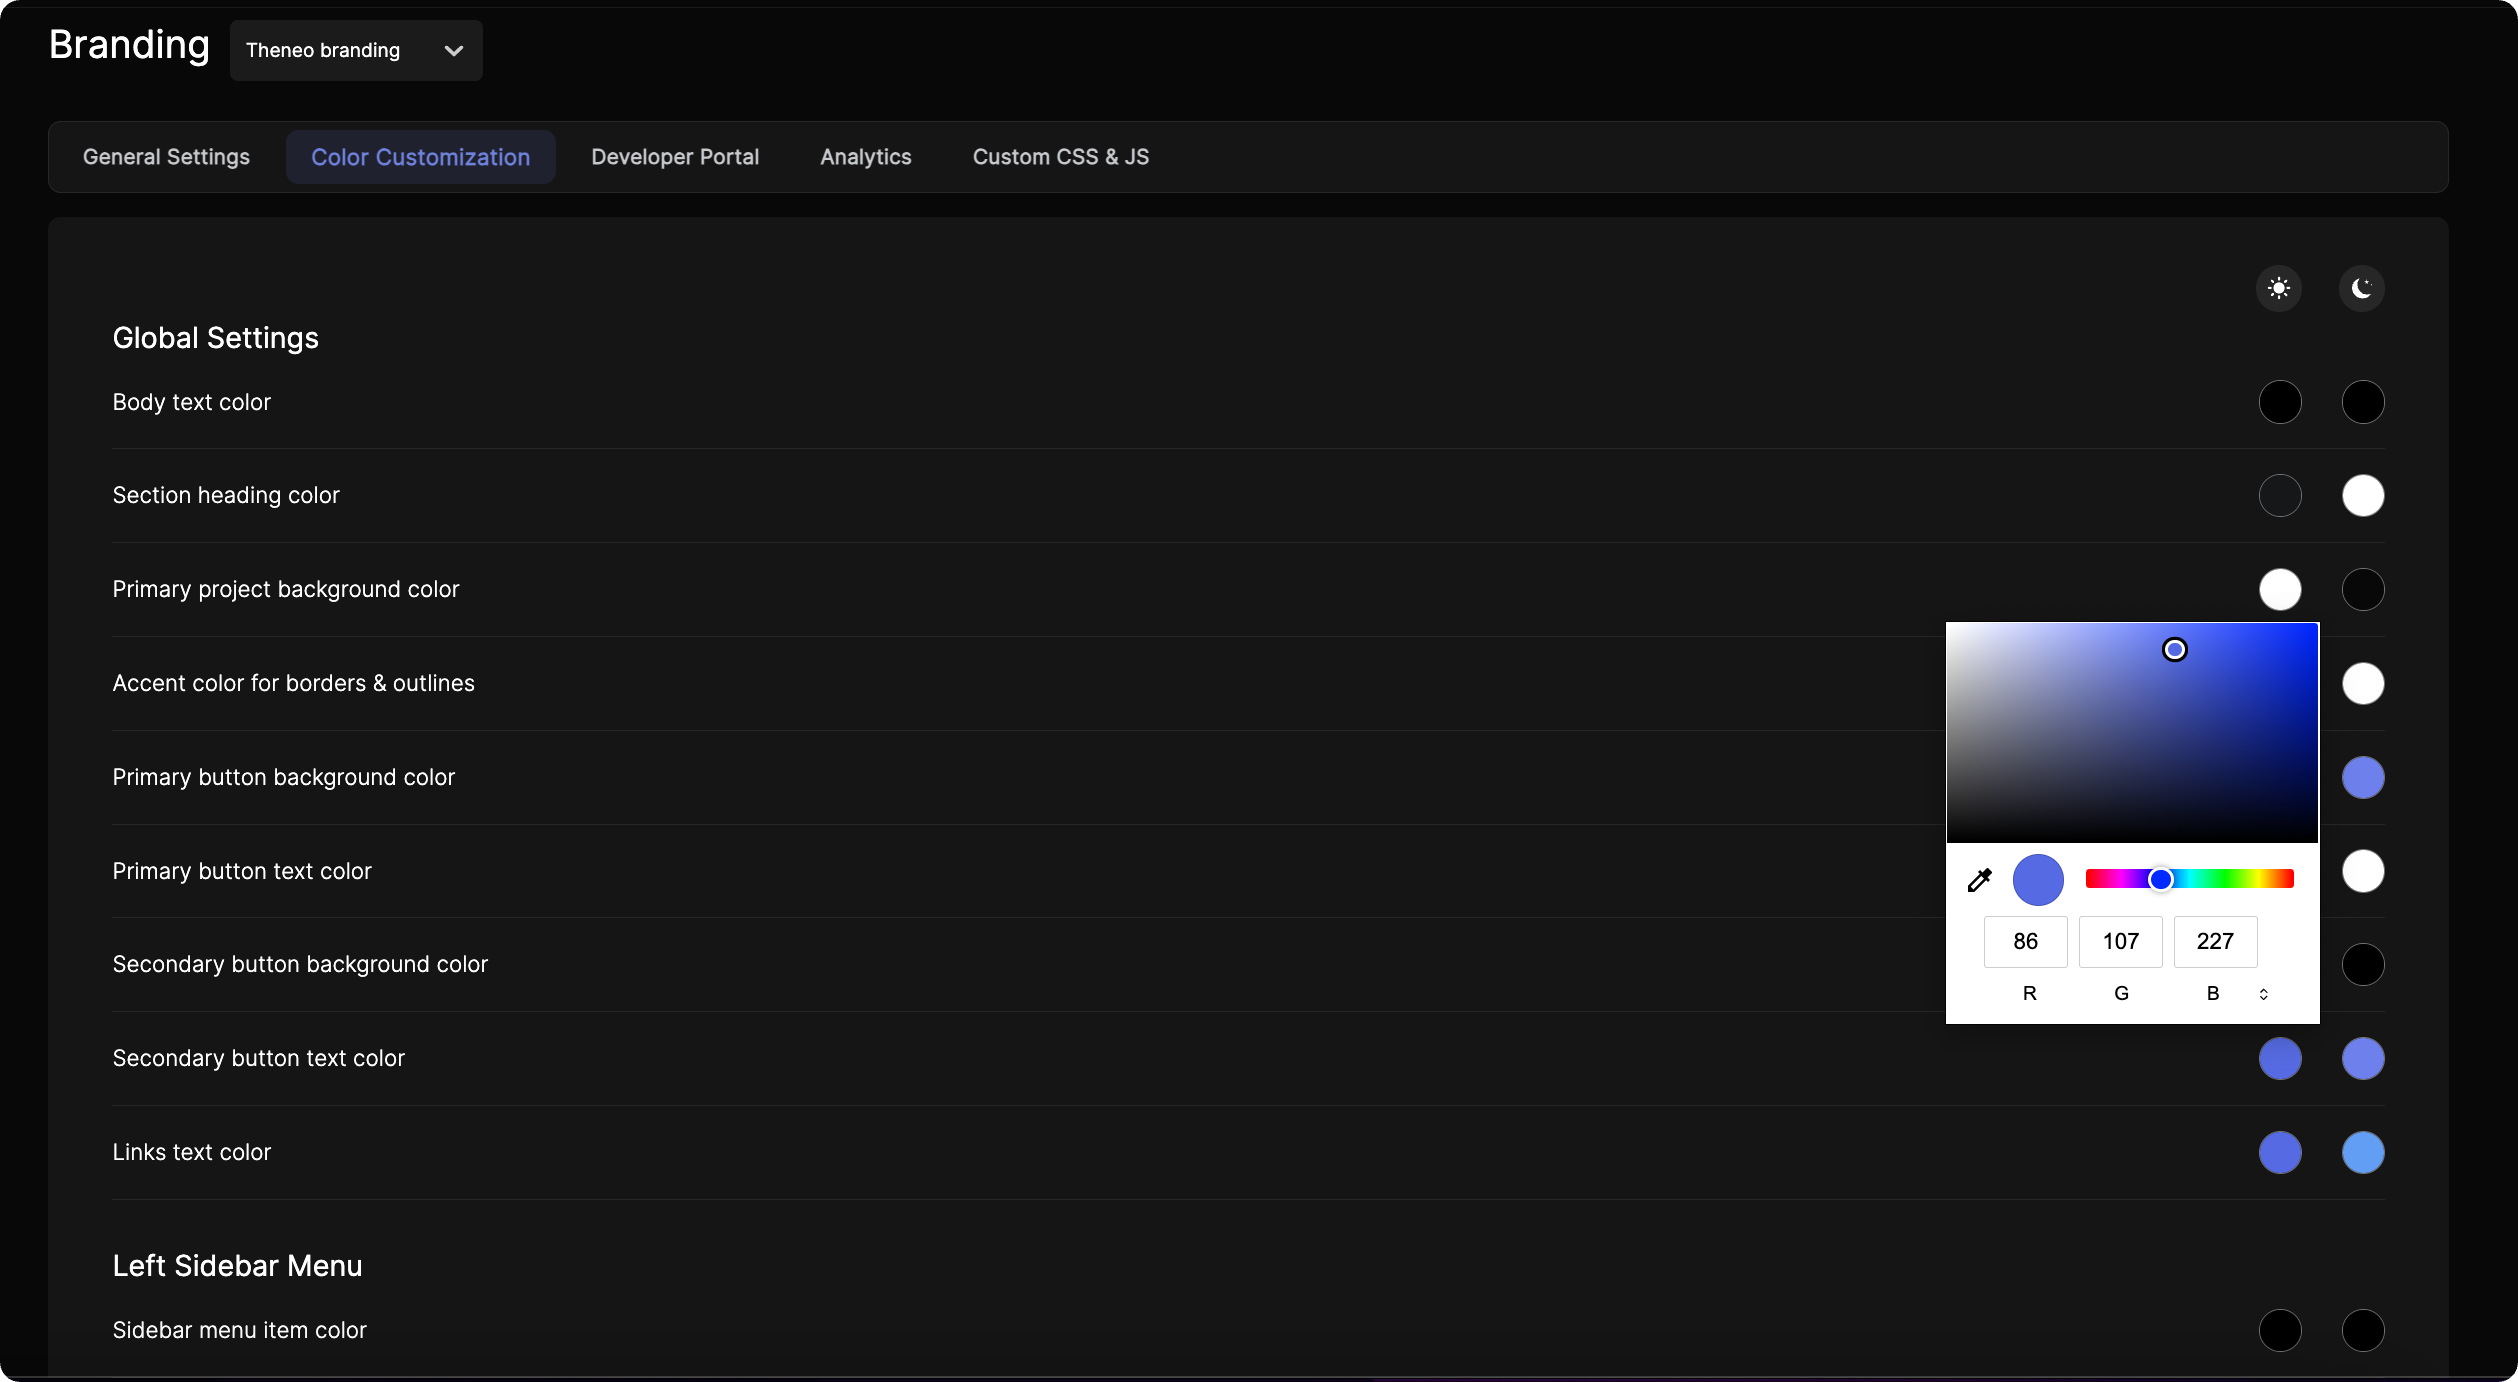
Branding & Styling
Craft a distinctive look and feel for your Theneo documentation with extensive branding and styling customization options. From choosing the right color palette to setting a custom domain, Theneo empowers you to align your documentation with your brand identity.
Key customization features include:
- Light and Dark Mode Customization: Tailor your documentation's appearance for both light and dark mode preferences with dedicated logos and color schemes, ensuring a consistent user experience in any setting.
- Color Customization: Fine-tune the color of text, buttons, backgrounds, and more with an easy-to-use color picker. Double-click to access HEX codes for precise matching to your brand colors.
- Custom CSS and JavaScript: For advanced customization, inject custom CSS and JavaScript to take full control over the look and functionality of your documentation.
- Custom Domains: Strengthen your brand's online presence by hosting your documentation on a custom domain, creating a seamless transition from your main website to your Theneo-hosted content.
With Theneo's customization tools, you can create documentation that not only serves its purpose but also resonates with your brand's aesthetic and ethos, making every interaction with your API an extension of your brand experience.
What made this section unhelpful for you?
Customizing project look
In Theneo, you have complete control over the look and feel of your documentation. This is achieved through an extensive set of color customization options that cater to every aspect of your project's interface. Here's a detailed overview of what you can configure:
What made this section unhelpful for you?
General settings
General Settings:
- Logos: Upload separate logos for light and dark modes, ensuring clear visibility regardless of theme. Ideal dimensions are provided for optimal display.
- Favicon: Customize the small icon that appears in browser tabs and bookmarks to make your site easily identifiable.
- Logo Hyperlink: Direct users to your desired URL through the logo in your documentation.
- Attribution: Toggle the "Powered by Theneo" attribution on or off to match your branding preferences.
- Document Font: Select from a variety of fonts to maintain consistency across your documentation.
Color Customization of the published view projects:
Global Settings:
- Body Text: Determine the color of the main text for readability against the background.
- Section Headings: Highlight section titles with distinct colors for better navigation.
- Background: Choose a primary color for the project's backdrop.
- Accents: Accentuate borders and outlines with a complementary color.
- Buttons: Set the background and text colors for buttons to align with your brand.
- Links: Define the color of hyperlink texts to make them noticeable or integrated.
Left Sidebar Menu:
- Item Colors: Manage the colors of individual items and the active selection to enhance the sidebar's functionality and aesthetics.
- Background: Select a primary background color for the sidebar for a unified look.
Content Cards:
- Code Snippets: Customize header and body background colors for code snippet cards for clarity.
- Base URL: Adjust the color scheme of the Base URL card headers and bodies.
- General Info: Set the header and body background colors for general information cards.
Feedback and Text Selection:
- Feedback Button: Ensure your feedback button stands out or matches your design with customizable colors.
- Text Selection: Personalize the background and font colors of text selections to reflect your brand.
API Explorer Buttons and Response Boxes:
- Buttons: Choose colors for your API Explorer buttons that prompt users to interact.
- Response Boxes: Assign colors to property and value texts in response boxes for distinct visibility.
Alerts:
- Customize background, icon, text, and border colors for warning, primary, danger, and success panels, ensuring that each alert type is distinct and noticeable.
Each of these elements can be adjusted for both light and dark modes, maintaining consistency or providing contrast as per your branding guidelines.
What made this section unhelpful for you?
Custom CSS & Javascript
Custom CSS and JavaScript are powerful tools for personalizing and enhancing the functionality of your Theneo documentation. This guide will walk you through the process of implementing custom CSS and JS to tailor the look and feel of your project.
Step 1: Access Custom CSS and JS Settings
Navigate to the 'Branding' section in your Theneo dashboard. Within the Branding menu, you will find a tab or section labeled 'Custom CSS & JS.' This is where you can add your code snippets.
Step 2: Write or Paste Your Custom CSS
In the Custom CSS field, you can write your own CSS rules or paste existing snippets. This can include styles for:
- Custom fonts and text styles
- Overriding default padding and margins
- Background images or gradients
- Custom animations or transitions
- Responsive adjustments beyond the standard layout
Ensure that your CSS is properly formatted and does not contain any syntax errors to avoid any display issues.
Step 3: Write or Paste Your Custom JavaScript
The Custom JS field is where you can add JavaScript to your documentation. Common uses for Custom JS include:
- Implementing third-party scripts such as analytics or live chat support
- Custom interactions or behaviors for buttons and links
- Dynamic content loading or page manipulation
- Form validation and submission handling
Make sure your JavaScript is well-tested to prevent any conflicts with Theneo's existing scripts.
Step 4: Save Your Changes
After adding your custom CSS or JS, click on the 'Save' button to apply the changes. It's important to review your changes to ensure that they produce the desired effect without interfering with the user experience or functionality.
Custom domain
A custom domain is a unique branded label that identifies your presence on the Internet. It's essential for establishing brand identity and ensuring a professional appearance for your Theneo projects and Developer Portal. Here's a step-by-step guide to setting up a custom domain for your Theneo-hosted content.
Custom Domain for Projects
- Access Project Settings:
- Log in to your Theneo account.
- Navigate to the settings of the project you want to assign a custom domain to.
- Select the "Custom Domain" section.
- Enter Your Domain:
- Specify the custom domain you wish to use, such as
docs.yourdomain.com.
- Configure DNS Settings:
- Log into your domain provider’s control panel.
- Add a CNAME record pointing your custom domain to Theneo’s hosting environment, typically
custom.theneo.io. - For example, the DNS entry would look like this:
developers.example.com. 3600 IN CNAME custom.theneo.io.
- Finalize Setup in Theneo:
- After updating DNS settings, go back to Theneo and save your custom domain configuration.
- It may take some time for DNS changes to propagate. Once done, your project will be accessible via the custom domain.
Custom Domain for Developer Portal
- Access Developer Portal Settings:
- Go to the Developer Portal settings within Theneo by visiting
https://app.theneo.io/developers-hub/settings.
- Specify Custom Domain:
- Enter the custom domain for your Developer Portal, ensuring it aligns with your brand, such as
developers.yourdomain.com.
- DNS Configuration:
- Similar to project settings, establish a CNAME record in your DNS configuration, pointing to Theneo’s specified domain.
- Activate Your Domain:
- Finalize your domain settings in Theneo's Developer Portal settings page.
- Check for successful DNS propagation before the domain goes live.
Important Tips:
- DNS Propagation: Changes to DNS records can take up to 48 hours to propagate fully across the Internet.
- SSL Certificates: Theneo automatically generates SSL certificates for custom domains, ensuring secure connections.
What made this section unhelpful for you?
Custom analytics
Integrating Google Analytics (GA) or Google Tag Manager (GTM) with your Theneo platform allows you to track user interactions and gain insights into how your application is being used. Follow the steps below to add your unique GA tag or GTM ID:

Step 1: Navigate to Branding Settings
- Log in to your Theneo account.
- On the dashboard, locate and click on the “Branding” option in the main navigation menu.
Step 2: Access Analytics Configuration
- Within the Branding section, you will see a submenu. Click on the “Analytics” tab to open the analytics configuration options.
Step 3: Adding Your Google Analytics Tag ID
- To add a Google Analytics tag:
- Find the field labeled "Google tag ID."
- Click on the pencil icon (edit button) next to the field.
- Enter your Google Analytics ID, which usually starts with “G-” followed by a series of numbers.
Step 4: Adding Your Google Tag Manager ID
- To add a Google Tag Manager ID:
- Locate the field marked "Google tag manager."
- Click on the pencil icon (edit button) next to this field.
- Input your GTM ID, which typically begins with “GTM-” or “UA-” followed by a series of numbers.
Step 5: Save Your Changes
- After entering your IDs, ensure to save the changes by clicking the save icon or button typically located at the bottom or top-right of the page.
Step 6: Using Custom JavaScript for Other Analytics Services
If you use an analytics service other than Google Analytics or Google Tag Manager:
- Go back to the submenu under “Branding.”
- Select “Custom CSS & JS” to access the custom scripting functionality.
- Here, you can add your own JavaScript tracking codes as needed for other analytics services.
Important Notes
- Verification: After adding your GA or GTM IDs, it is crucial to verify that they are working correctly. You can do this by checking your GA or GTM dashboard to see if it is receiving data from your Theneo platform.
- Custom JavaScript: If you are not familiar with JavaScript and need to implement custom tracking scripts, consider consulting with a developer or your analytics provider for assistance.
What made this section unhelpful for you?
Developer Portal
A Developer Portal, also known as a Developer Hub, is a centralized platform designed to facilitate and manage the interaction between an organization and its developer community. It serves as a comprehensive resource for all things related to an organization's APIs or development tools, providing necessary documentation, API keys, resources, support, and community discussions.
Key features of Theneo's Developer Portal include:
- Customization: Users can select from professional templates or import their own designs, ensuring the portal aligns with the brand's visual identity.
- API Showcasing: The platform allows for a prominent display of API references, enabling users to easily discover and comprehend the available APIs.
- SDKs and Guides Documentation: Beyond APIs, Theneo supports documentation for SDKs and guides, creating a holistic resource for developers.
- Interactive AI Chat & API Explorer: Theneo integrates a GPT-4 powered AI Chat for instant smart responses and an interactive API Explorer for an immersive user experience.
- Content-Rich Portals: Users can augment their developer portal with additional resources like guides, blog posts, and linked content, providing a richer experience.
- Flexibility and Control: Import your own code and designs with complete freedom to customize your portal to your specifications.
Workspaces & Project Management
What are Workspaces?
Workspaces in Theneo are distinct areas within the platform designed to manage different projects or teams under one umbrella organization. They serve as separate containers that allow for distinct management of APIs, documentation, and team access. Each workspace can have its own branding, permissions, and configurations, making it an ideal solution for companies with multiple products or teams.
Benefits of Using Workspaces:
- Team Management:
- Allocate specific workspaces to different teams within the organization.
- Set permissions and roles to control access and maintain security.
- Brand Consistency:
- Customize branding for each workspace to align with the product or team identity.
- Manage multiple branding configurations without affecting other workspaces.
- Organized Documentation:
- Keep documentation for different products or APIs separate and organized.
- Provide tailored information relevant to the users of each workspace.
- Targeted Landing Pages:
- Design and use different landing pages for each workspace to cater to the specific audience or user base.
- Enhance user experience by directing them to the relevant workspace right from the start.
When are Multiple Workspaces Relevant?
- Multiple Products: If your company offers a range of products, each with its own set of APIs and documentation, separate workspaces allow for tailored content management without overlap.
- Distinct Branding: Companies that operate different brands under one corporation can use workspaces to manage and present APIs in line with each brand’s guidelines.
- Team-Specific Access: For organizations with several engineering teams, each responsible for different APIs, workspaces provide a way to segment API ownership and control who has access to what.
- Project Phases: During different stages of development, such as testing and production, workspaces can be used to segregate and manage these environments effectively.
Implementing Workspaces:
- Setup: Administrators can create and configure workspaces from the Theneo dashboard.
- Customization: Each workspace can be customized with its own branding and landing pages.
- Access Control: Assign team members to workspaces and define their roles and permissions.
- Content Management: Develop and maintain API documentation that's specific to the needs of each workspace.
In summary, workspaces in Theneo provide a powerful means to segment and manage your API documentation and teams. They offer the flexibility to support multiple products, brands, and teams within a single platform, ensuring that each can operate with its required level of autonomy and specificity
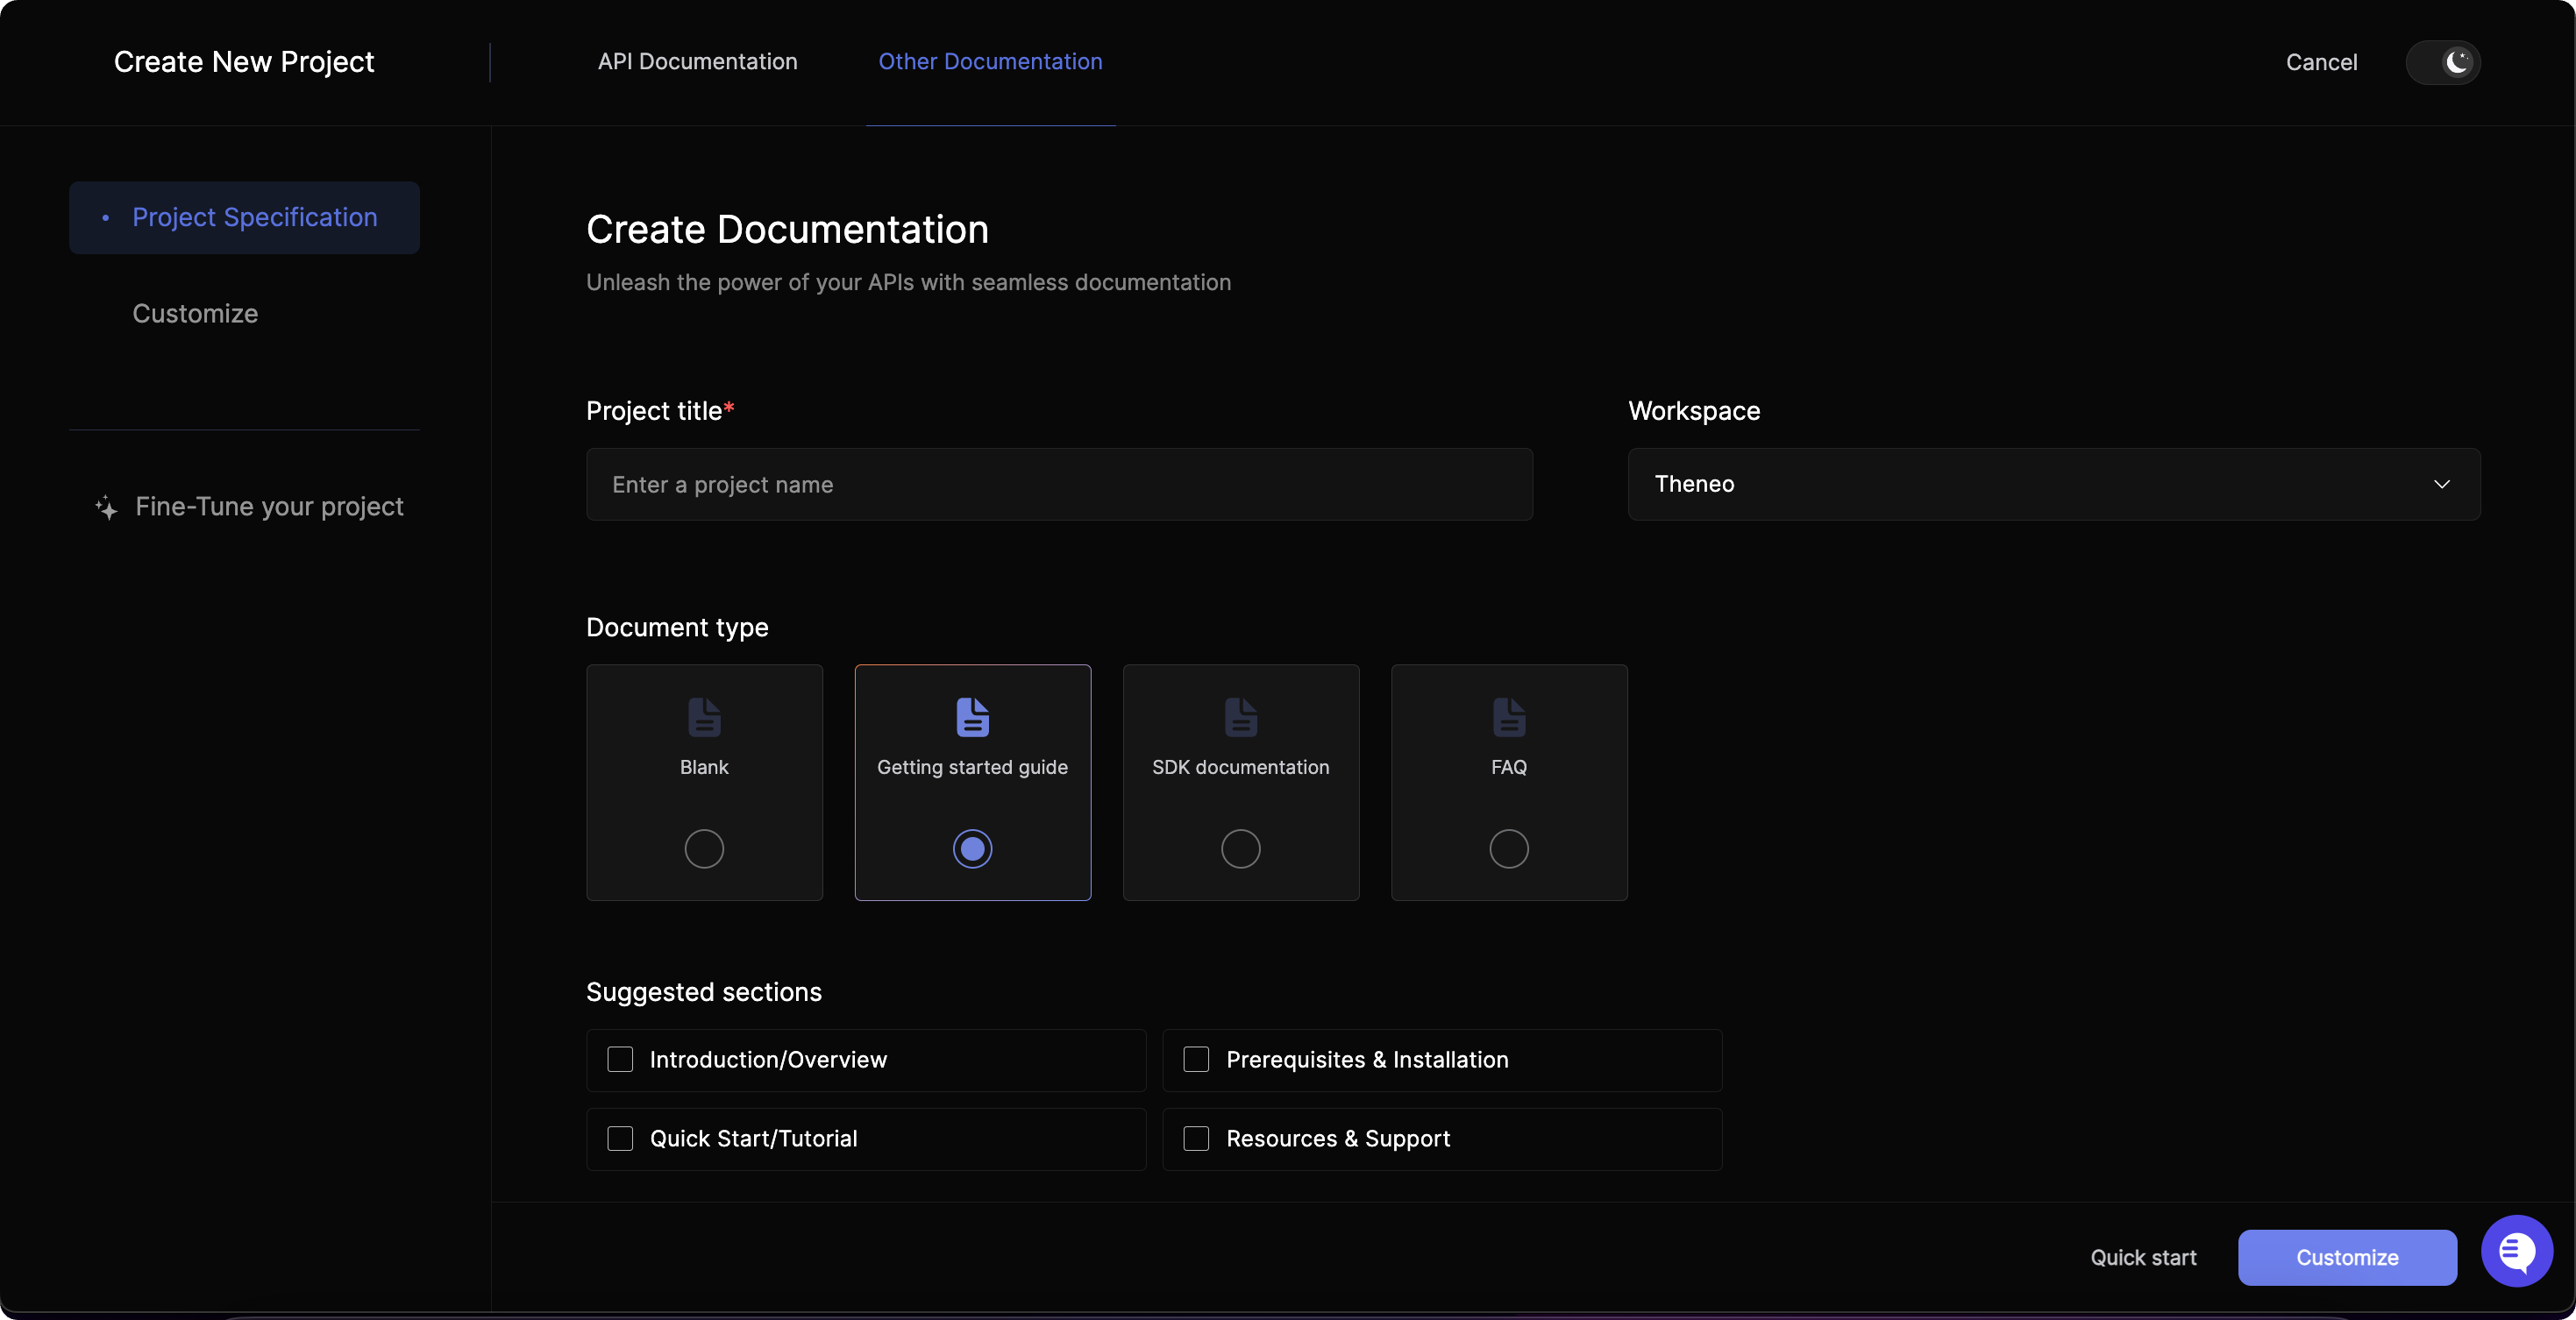
Product & User Guides / Docs
Theneo's flexible documentation platform supports not only API documentation but also a wide variety of content types, including comprehensive user and product guides. This flexibility enables you to create rich, informative content tailored to your audience's needs, whether they are developers, product managers, or end-users.
Getting Started with Guides
- Initiate a New Project:
- Navigate to the "Create New Project" area.
- Select "Other documentation" to branch out beyond API docs.
- Choose a Template:
- Pick from a range of predefined templates like "Getting started guide", "SDK documentation", or "FAQ" for a quick start.
- Opt for a "Blank" template for full creative control from scratch.
- Customize Your Content:
- Use Theneo’s editor to add various content elements and structure your guide.
- Include text, images, videos, and more to make your guide engaging and helpful.
What made this section unhelpful for you?
FAQ
How do I delete parameter?
To delete a parameter, follow these steps:
- Switch to the code view mode in the widget.
- Select the parameter you wish to delete.
- Proceed with the deletion.
How can I delete my Theneo account?
To permanently remove your account and all associated data, please contact our support team directly at hello@theneo.io. A support representative will guide you through the secure account deletion process.
How can I create a workspace?
You can create a workspace in Theneo using one of the following methods:
If the corporate workspace toggle is enabled during sign-up, you can:
- Join an existing corporate workspace associated with your corporate domain.
- Create your own corporate workspace.
If the corporate workspace toggle is disabled during sign-up, you will automatically be added to your personal workspace upon account creation.
If you already have an account with a personal workspace, you can convert it to a corporate workspace:
- Go to user settings -> admin tab.
- Select "Convert as corporate" option.
- Name your workspace and confirm the conversion.
How can I link sections within my Theneo documentation?
Here's how to achieve this:
- Navigate to your published documentation and locate the section you want to link to.
- Copy the URL displayed in your web browser's address bar for that specific section.
Switch to the editor view within your Theneo project.
- Select the text you wish to convert into a hyperlink. This text will act as the clickable anchor point for your readers.
- Locate the "link" option within the Theneo editor's formatting tools.
- Paste the previously copied URL from step 1 into the designated field within the link creation menu.
- Confirm the link creation by clicking "Enter".
By following these steps, you've successfully established a hyperlink within your Theneo documentation, allowing readers to navigate seamlessly between different sections.
Can I update the auto-generated URL slug?
Here's how to update the URL slugs:
Project Slug:
- Access your project settings.
- Navigate to the "General" tab.
- Locate the project slug setting and click on the edit icon.
- Make your desired changes to the slug text.
- Save your adjustments.
Section Slug:
- Go to the "SEO management" section within your Theneo project.
- Identify the specific section you want to modify the slug for.
- Locate the edit option for the section's slug.
- Update the slug text according to your preference.
- Save your changes.
How do I restore my last published project?
Here's how to achieve this:
- Access Project History: Locate the top-right menu within the Theneo editor.
- Select Desired Version: Click on the "History" option within the menu. This will display a list of previous versions associated with your project.
- Identify and Restore: Find the version corresponding to your last published project. This can be identified by a timestamp. Once you've located it, click to restore.
How to download published document?
Downloading published document is currently available in our growth package, please contact our customer support directly at hello@theneo.io for an access.